Zoom Class Management
The following article explains how a Zoom class can be managed by the instructor to ensure the best student learning experience.
Tips for managing and online class
For more general information and strategies please see the following article Managing an online class
Preparing for a Zoom Class
Make sure to include information about class attendance in your learning site, this can be located in an announcement, unit orientation module or unit profile. It is a good idea to also email students with instructions prior to the first class Zoom meeting.
- Include information on student participation and whether or not cameras/microphones will be required.
- Use the Zoom Blackboard LTI integration to add Zoom to the unit learning site.
- Make sure students are aware of how and when to join the Zoom session and provide a link to the Zoom Getting Started Knowledge Base article.
Setting student expectations
Setting and communicating clear boundaries around student expectations in the Zoom class is essential early on, especially in a six-week term.
- It is a good idea to present your guidelines and expectations up front in the first Zoom class meeting, and to also provide this information in the unit learning site.
- Be sure to indicate whether students are required to join the meeting live, or if watching the recording is acceptable.
- Provide students with information about expected online behaviours, such as a guide to netiquette.
- Remind students about the SCU Code of Conduct expectations, and that appropriate actions will be taken in an online class as they would with inappropriate behaviour in the classroom.
Guidelines for using the Chat
Establishing guidelines around the use of the Chat tool is class is beneficial for everyone. In a Tutorial, using the Chat may be useful to elicit short student responses, or to periodically address student questions. Meanwhile, in a Workshop of over 500 students, disabling the Chat altogether prevents an out of control chat discussion, and removes the need to manage a stream of student questions.
Managing the Class
It is a good idea during the first class meeting to have students practice using Chat, Raise Hands, Mute, etc. You should discuss class expectations around using the Zoom Reaction buttons (thumbs up, etc). You may guide students on how to use the Reactions 'Raise Hand' tool or the 'Yes' or 'No' buttons. Also consider how the Chat tool might be used by students, to ask questions, provide comments, respond to activities or as a backchannel.
Using the Waiting Room
The Zoom Waiting Room is a fantastic way to manage the start of your meetings. By enabling the Waiting Room, students will not enter your meeting until you are ready to start the meeting. When you disable the Waiting Room students who join later can directly enter the meeting. If your meeting is set to start on the hour, you can join earlier in order to prepare your PowerPoint, polls, quizzes, or screen share. When you are ready to let students into the meeting, click on the participants list, then Admit all. You can turn the waiting room on and off at any time during a meeting. Placing a student into the Waiting Room during a meeting also allows you to isolate a student for any reason.
The following video explains how to access and manage the waiting room settings, customise the waiting room message and enable/disable the waiting room in a Zoom meeting.
Security Settings for Zoom meetings
Zoom features a range of security options that can be enabled or disabled, including Screen Sharing and use of the Chat. Understanding the control options available in Zoom and how these can be used is critical to managing a positive online class experience for students. For example, in a large cohort, you may disable the chat, informing students to direct their queries to the Blackboard discussion forums. In a small group, you may ask students to work in Zoom Breakout rooms where they may need participant permissions to screen share collaborative work. Managing students with the Participant controls allows you to enlist help or remove unruly participants.
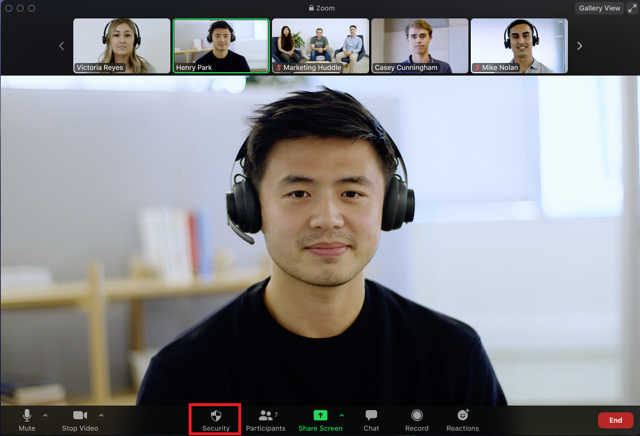
During a meeting, you can adjust the security settings using the Security Shield, which is located at the bottom Zoom control bar (see red box in the image below).
This security shield allows you to manage student interaction during class meetings. Experiment with the above Zoom security features before class so that you are comfortable with how they function. The following video walks through these settings, illustrating how they can be enabled/disabled from the security shield.
The key features shown in the video above have been linked below for easy reference.
- Lock Meeting to prevent students from joining (0:30)
- Enable/Disable Waiting room (0:55)
- Hide Profile Pictures used by students (1:17)
- Allow students to Share Screen (1:24)
- Prevent students from using the Chat (2:12)
- Allow students to Rename Themselves (2:20)
- Allow students to Unmute Themselves (2:52)
- Start Video prevents students from using their webcam (3:27)
- Suspend Participant Activities locks all student participation (3:50)
Stopping difficult student behaviours
If you experience challenges with difficult students that disrupt the class, make sure you are comfortable with Zoom the features which allow you to Mute all participants, place them in a Waiting Room, or even Remove Participant from the meeting altogether. Ensure that you are also familiar with Student non-academic conduct rules and reporting procedures for serious matters.
To remove a participant from a Zoom meeting:
- Click Participants in the host controls to display the participants list:

- Click Pop Out to separate the participants list from the meeting window.

- Hover over a participant and click More, then click Remove.

Using Co-Hosts to help manage meetings
Zoom Co-hosts have similar permissions to the host of a Zoom meeting. Having an extra person (such as a colleague or guest speaker) to assist with the delivery of class (especially a large class) can ensure that things run smoothly and provide more opportunities to respond to students.
You may find managing a Tutorial with the assistance of Co-hosts useful, and you can assign these permissions to enlist help in Breakout Rooms. In a Workshop, you could pre-arrange assistance, using Co-hosts to facilitate Polls, Quizzes, or Breakout rooms while you attend to the delivery of content or address students' chat comments.
To add a Co-host in a Zoom meeting:
- Click Participants
 in the meeting controls at the bottom of the Zoom window.
 - Hover over the name of the participant who is going to be a co-host, and choose More.
- Click Make Co-Host.
The following article provides detailed guidance on Enabling and adding a co-host to a Zoom meeting.
Students as Co-Hosts
Consider actively including students in the management of the class by assigning co-host roles such as chat moderator, timekeeper, presenter, poll administrator or Q&A facilitator. Building trust and personal responsibility in a class environment through the use of student facilitators engages students, builds community and contributes to the promotion of a culture of excellence (Burgess, et al. 2015).
References
Burgess, A., van Diggele, C., & Mellis, C. (2015). Students as facilitators in a teacher training program: motivation for leadership roles. Advances in medical education and practice, 6, 615–620. https://doi.org/10.2147/AMEP.S92804