Zoom screen share
Sharing your screen is essential to engaging your students in class. With Zoom Screen Share, you can present a PowerPoint, walk through a website or software program, or even explain an assessment task step by step.
The following article covers:
Access Zoom screen share
The Zoom Share Screen button is located at the bottom of the Zoom control bar. Look for the Share Screen icon (highlighted in green below).

I can't see the Zoom control bar?
You may need to move your mouse towards the bottom of the screen in order for the control bar in Zoom to appear.
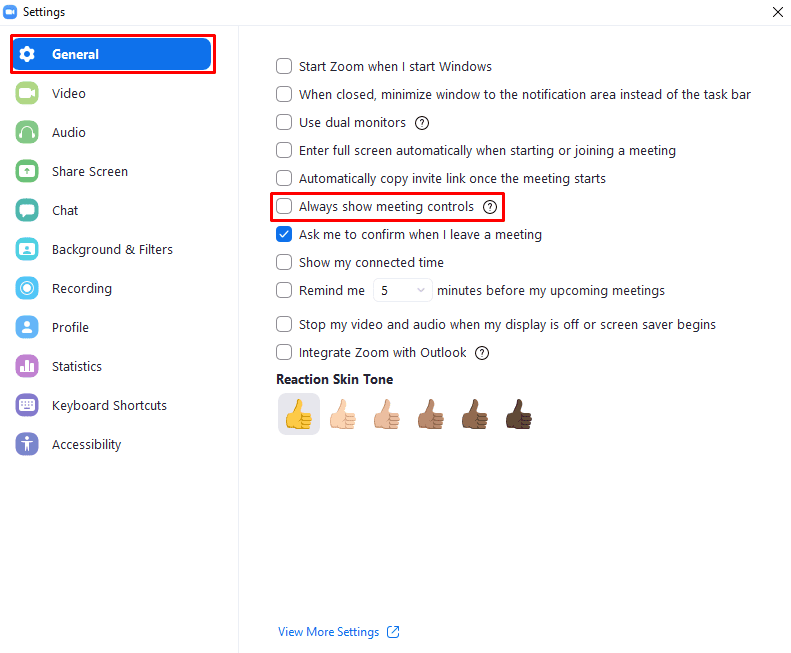
If you want the bar to always show, navigate to Zoom settings icon ![]() located in the top right-hand corner of the Zoom application.
located in the top right-hand corner of the Zoom application.
Once in the settings, tick the check box labelled “Always show meeting controls”, which can be found down in the “General” tab.
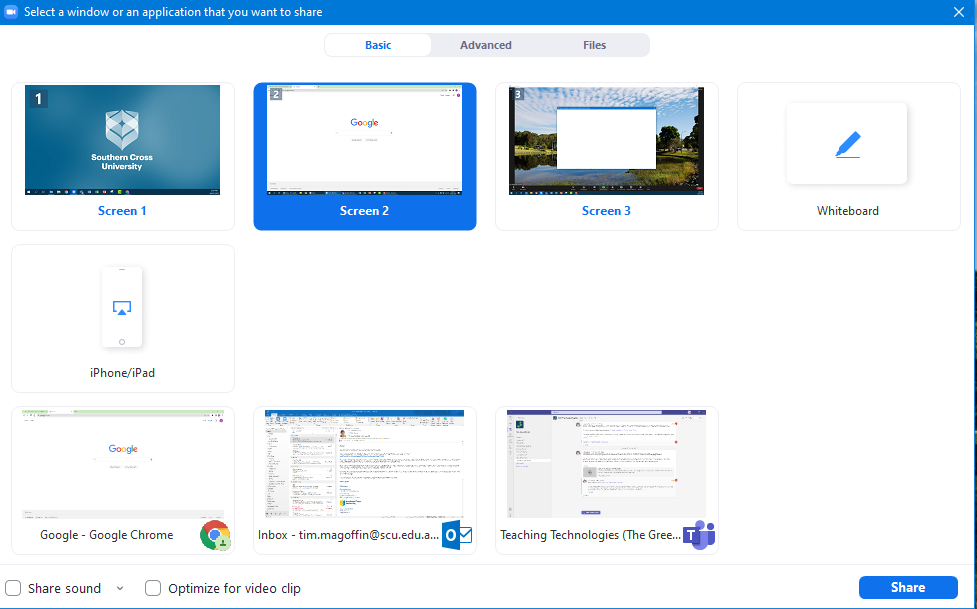
Clicking on the Share Screen button will enable you to select your entire screen (or screens if you have more than one), or to select an individual application that is open (e.g. a PPT, PDF, or even a YouTube video).
Once you have started a screen share, a new hidden menu is located at the top of your shared screen (move your mouse to the top of the screen). Use this hidden menu to Stop or Pause screen sharing or to access other Zoom tools.

Using Zoom in the hybrid classroom
There are some settings to be aware of when using Zoom in SCU's hybrid classrooms, especially if you are bringing your own laptop.
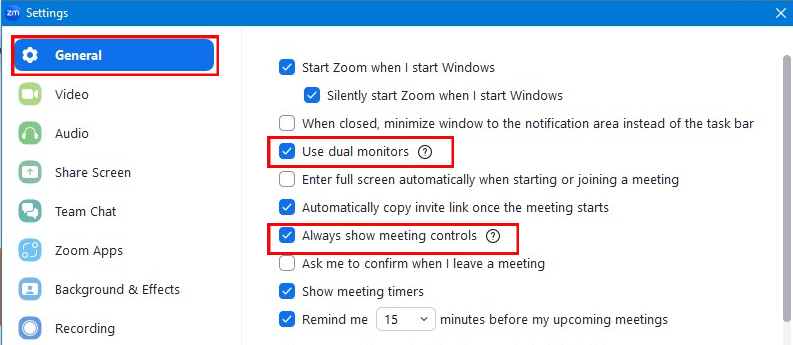
Dual screens: When you access the podium/in-house computer in the hybrid classrooms on campus for the first time, you will be using multiple screens. You must ensure that the dual screens option has been selected in the General settings menu  of the Zoom application if you are using your own laptop. If you are using the in-house computer in the hybrid classroom, it will already have all settings needed for Zoom meetings.
Ensure the background and effects are turned off. Because you are using cameras in your hybrid classroom it is important to remove any background effects and images in your Zoom settings. If the background settings are not turned off, students online will not be able to view the classroom.

Check before you Share
If you choose to share your entire screen (e.g. Screen 1 or Screen 2), anything open on that screen may be visible to participants, including emails, desktop icons or private documents.
Therefore, take your time and carefully only select a screen or specific application that you wish students to see.
PowerPoint Tip
When presenting with PowerPoint, for example, be sure to start the slideshow and present that window/screen as opposed to sharing PowerPoint the program. Your animations and transitions will only be visible to students if you have begun the slideshow and chosen that window for screen share.
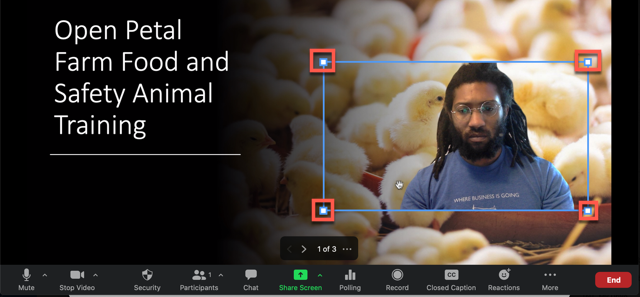
Other Zoom menus while using Screen Share
As you can see from the image above, you still have access to the Zoom menu tools to manage participants, run polls and quizzes, or even to open the Breakout Rooms (although in the image above, the Breakout Rooms button can be found under the "More" menu).
Screen sharing with sound
By default Screen Share does not include audio, so be sure to select the Share sound checkbox in the bottom left corner of the Share Screen box where you need to share sound (e.g. sharing a YouTube video).

Once you have started a screen share, you can also access the hidden menu located at the top of your shared screen (by moving your mouse to the top of the screen). Click the More icon with three dots, where you can enable/disable Share computer sound option.

Need to know more?
For more detailed information about using Zoom screen share please see the following article on Sharing your screen or desktop on Zoom
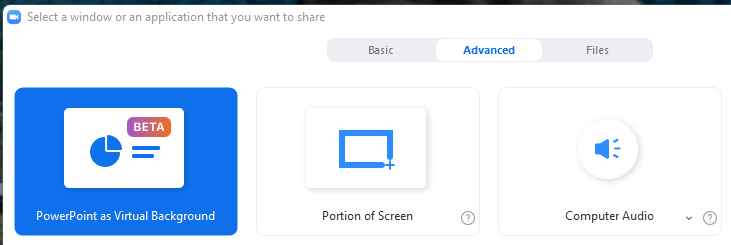
Advanced screen share options
The following advanced features of screen sharing can be used where appropriate.
- After clicking the green Share Screen button, you will see a bar across the top with "Basic / Advanced / Files". The default tab at the top is "Basic" screen sharing.

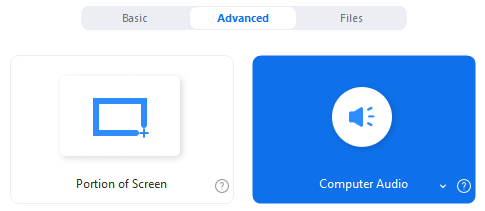
- The middle tab provides you with "Advanced" options.

Share audio only
You can share audio without sharing your screen by selecting the "Advanced" tab across the top of the Zoom Share Screen window.
- To share an audio file (e.g. just an MP3), select the "Advanced" tab, and then "Computer Audio".
- Once selected, click "Share" in the bottom right corner to share audio with no video for your students. A green bar will appear at the top of your screen, informing you that your PC sound is being shared:

Stop sharing with finished
When finished, you will need to click the red "Stop Share" button at the top of your screen.
Share a PowerPoint as a virtual background
The PowerPoint as Virtual Background function allows you to place a talking-head video over the top of a PowerPoint presentation. This feature requires you to open the PPT file from a folder via Zoom. Additionally, while sharing, you can move from slide to slide, but the original PPT's animations and transitions will be lost, as Zoom only shares each slide as a whole image.
You can re-size and move your camera around the screen when needed, i.e. away from visual items that change from slide to slide.
Your Camera no longer mirrors you
Note that your embedded camera visual will appear reversed to you. This does not, however, change how you appear to students. This may be visually disruptive for the person sharing, e.g. lifting your right hand will appear as your opposite hand on screen.
- Click on Share Screen and select The "Advanced" screen share tab to place your webcam video into a PowerPoint slideshow.
- Locate the PowerPoint as a Virtual Background option and select it.
- Click "Share" in the bottom right corner to open the PPT file location and then share with the embedded video of yourself. A green bar will appear at the top of your screen, informing you that your PC sound is being shared. During the share, the top of your screen will show a green bar noting that "You are sharing slides" along with the "Stop Share" button in red.

Stop sharing with finished
When finished, you will need to click the red "Stop Share" button at the top of your screen.
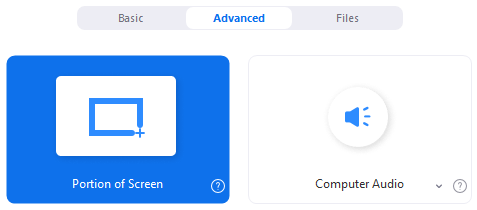
Sharing only a portion of your screen
You can avoid sharing an entire screen or an entire application.
- Click the "Portion of your Screen" option under the "Advanced" tab.
- This opens a green box-window that captures anything within its re-sizable area.
Sharing within the green window
While the box is green, anything within its boundaries is being shared.
While dragging/re-sizing/moving and the box is orange, the previously shared green box's contents will continue to be shared (i.e. as a frozen image) until you release the mouse from dragging/re-sizing/moving.