Av Hints at CHEC
Following is some information about using the AV resources at CHEC.
The Coffs Harbour Education Campus has a range of AV facilities in rooms from projectors, IWB to video conferencing. It's highly recommended that you check the room facilities before teaching/presenting.
NEW
A109, DTH150, DTH350 & MLG13 have been upgraded (January 2024)
See 'Lecture Theatres' section below for information
Some CHEC Campus teaching spaces maybe equipped with a HousePC, Connections are also available for Laptops.
Cables
The display cable should already be connected to the wall. The rooms at CHEC have either VGA or HDMI connections.

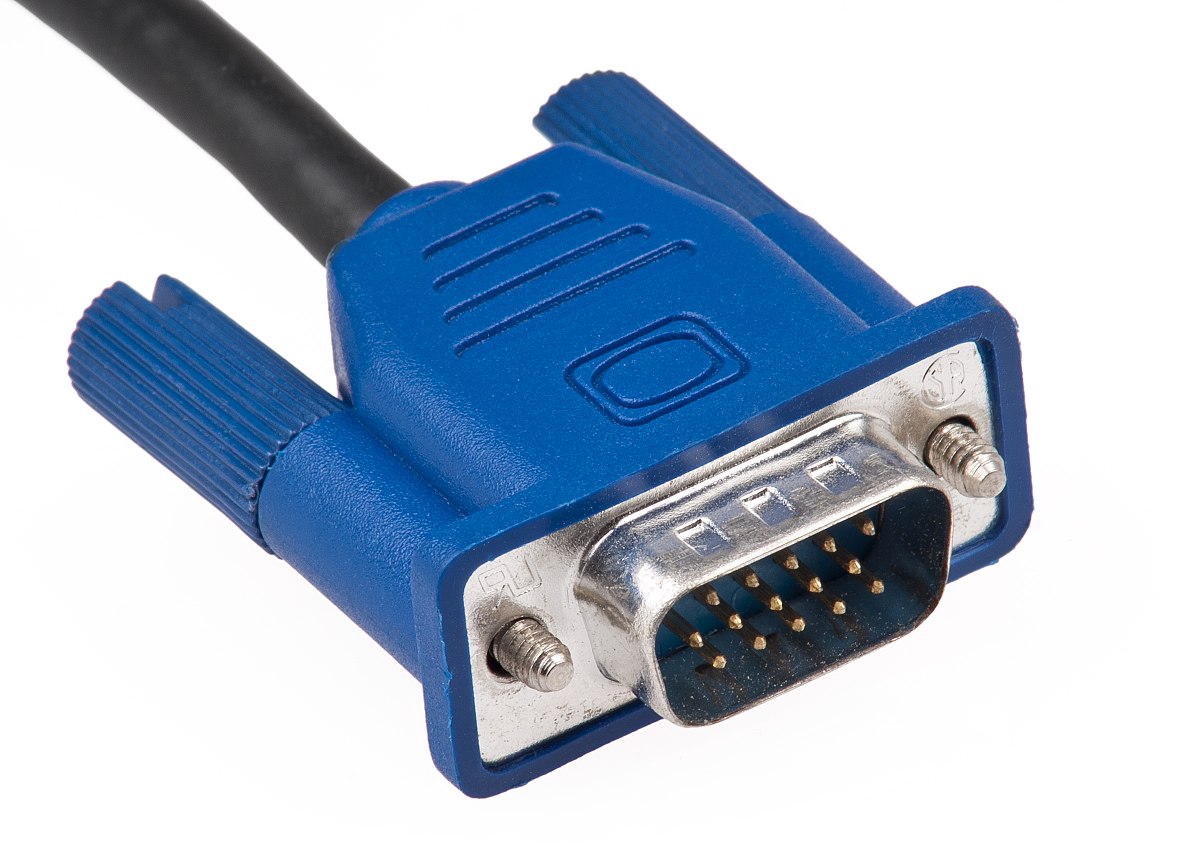
If your laptop doesn’t have one of these you’ll need a converter. Some are available for loan from the Student Learning Centre (E.G.19) or you can purchase from various shops e.g. Good Guys, Officeworks, JB HiFi or Harvey Norman.
CHSC Staff - there are some adapters/dongles available from CHSC Administration (A.G.23) for your CHSC owned laptops
Internet/Network Access
WiFi Only
Recommended Connection Steps
Step 1: Connect all cables
Step 2: Turn projector on
Step 3: Select Input
Step 4: Turn laptop on
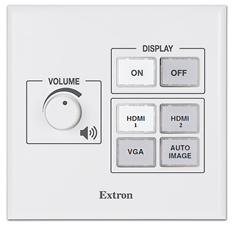
Step 1: Press ON button to turn projector on
Step 2: Once the projector has powered on fully (green light on projector is steady) or button stop flashing, select required SOURCE button
| VGA |
| Press the button labelled 'PC', 'Laptop', 'VGA' or 'Source' |
| HDMI |
| Press the button labelled 'HDMI' or 'Source' |
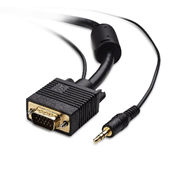
CLASSROOMS – Connect Laptop to VGA/HDMI cable located on adjacent wall plate. If you are using VGA you will also need to connect the audio cable to the laptop headphone socket
COMPUTER LABS – no connection required as the teacher’s PC is already connected
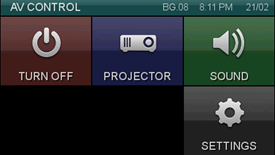
Step 1: Tap the touch screen to wake it up
Step 2: Tap the TURN ON button
Step 3: Tap the PROJECTOR button
Step 4: Select your input eg HousePC
Step 5: Turn on the computer
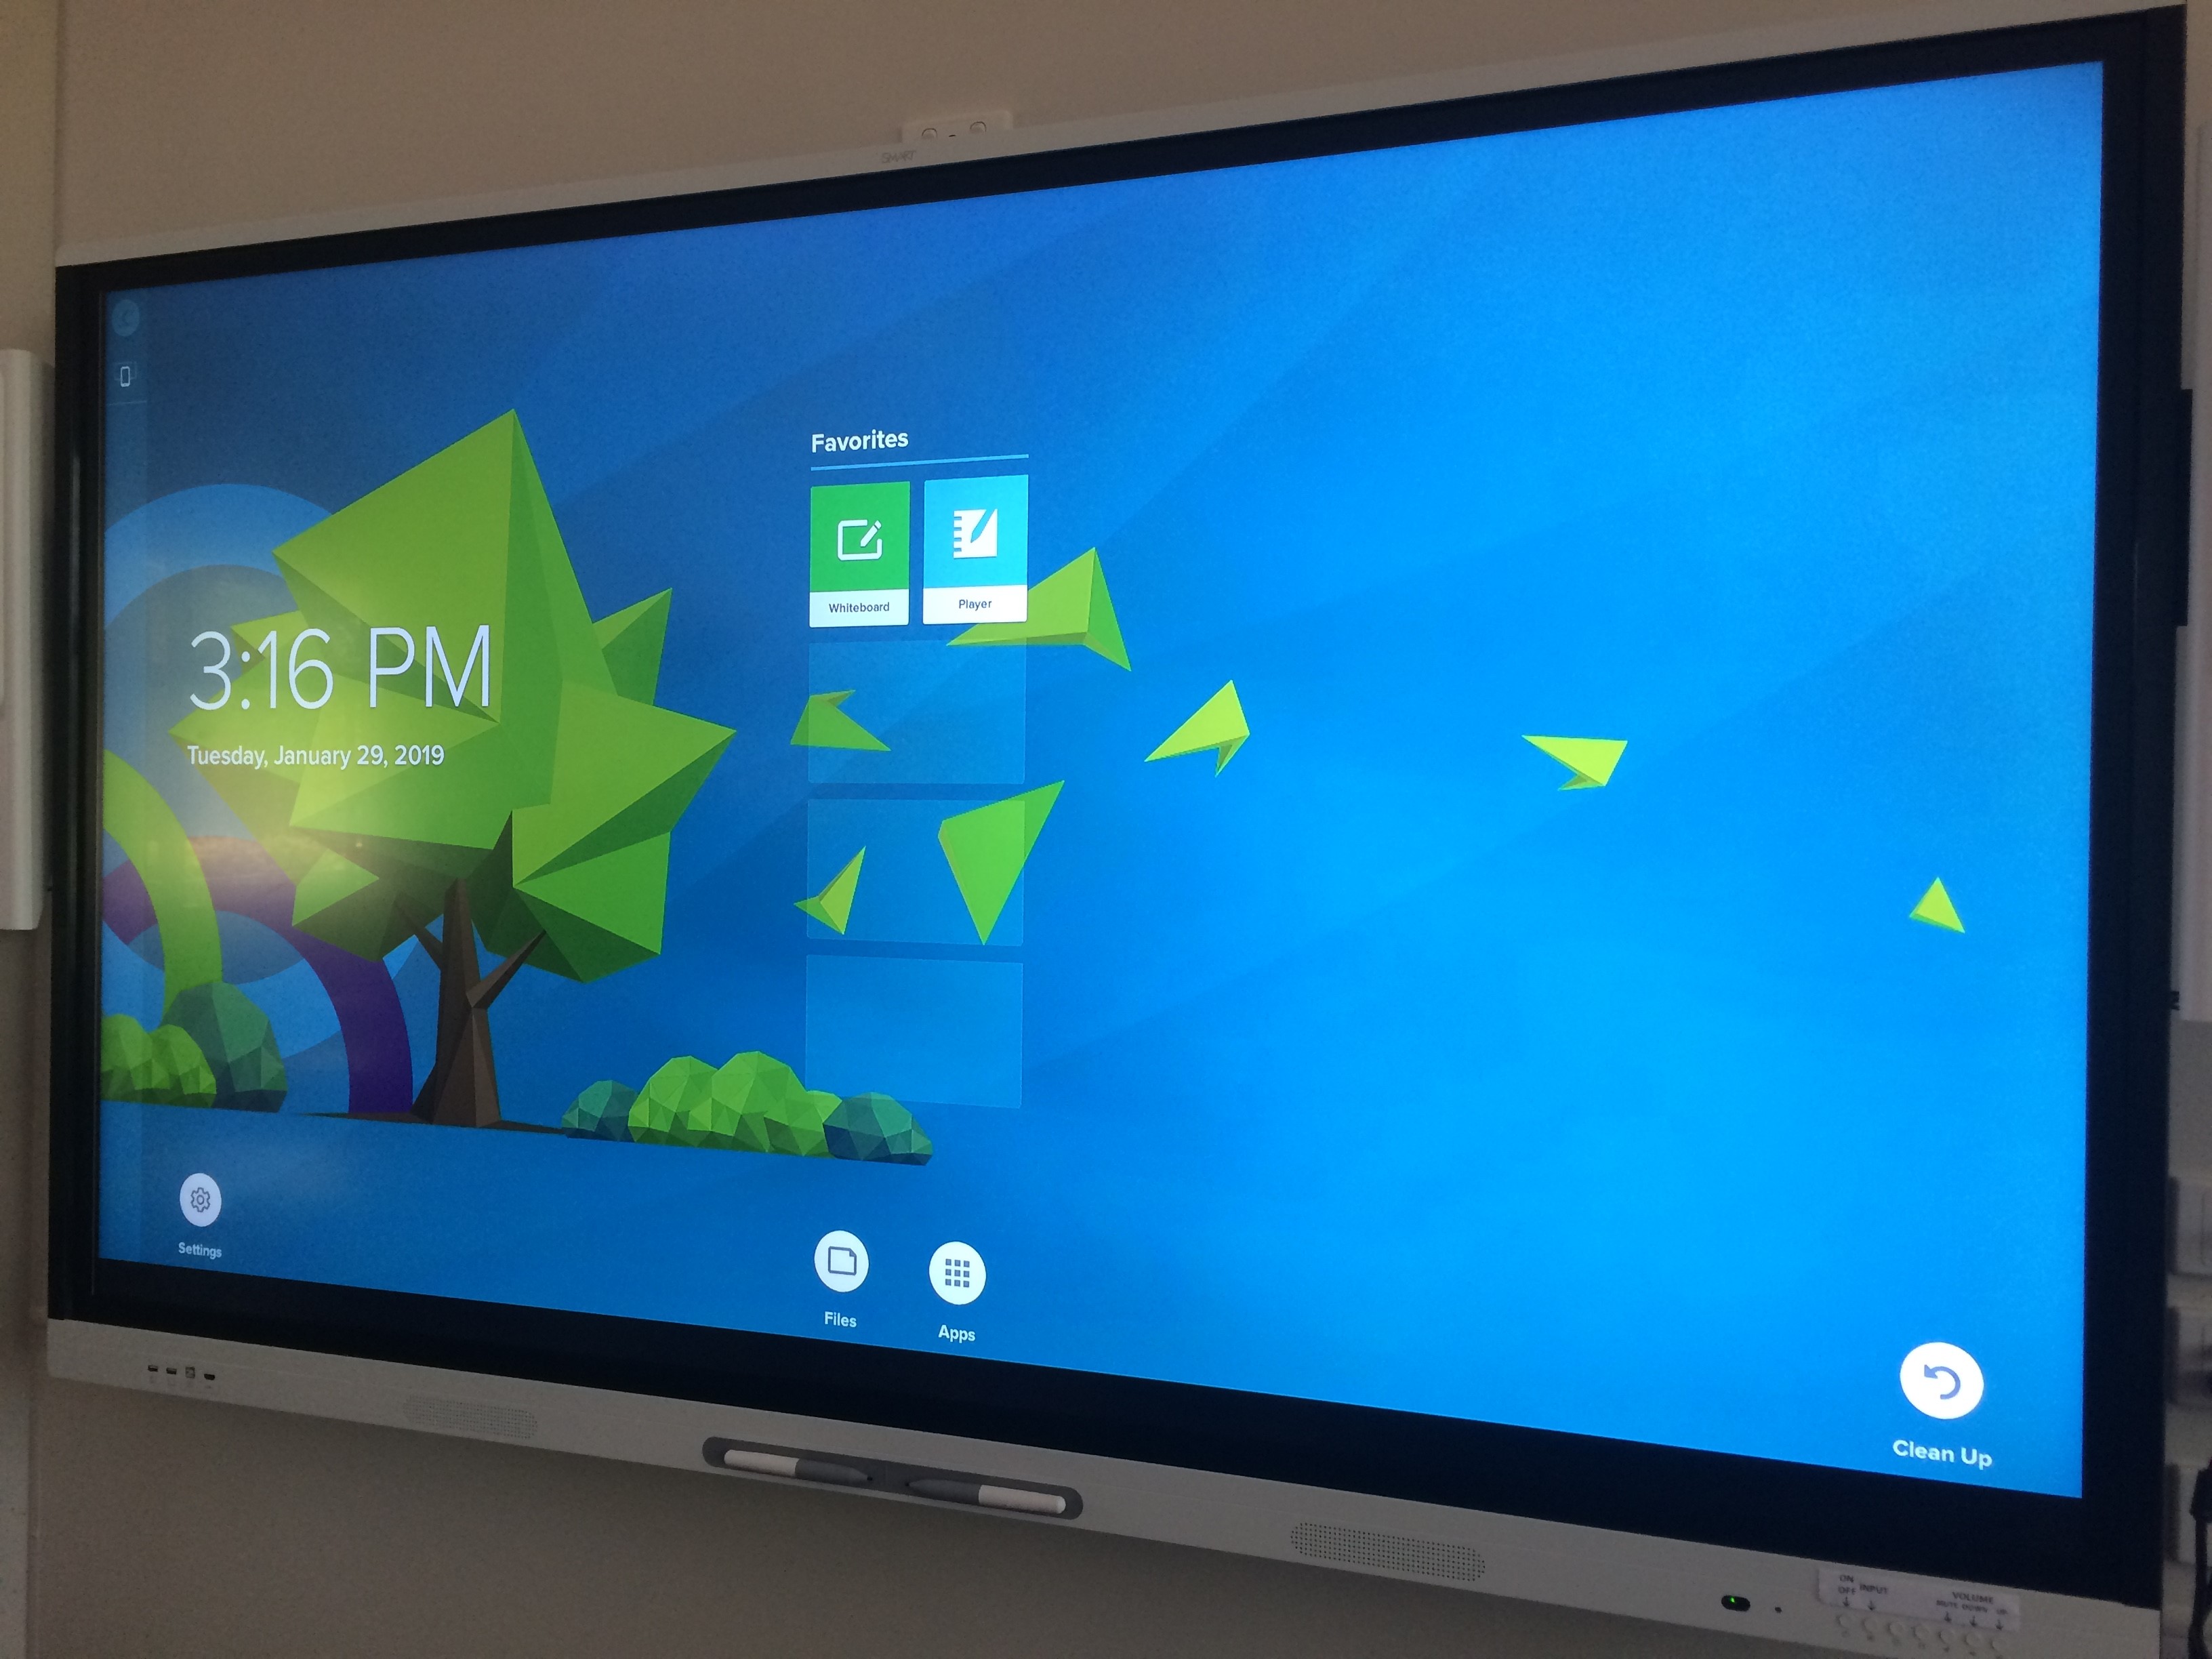
Can also be referred to as "smartboards"
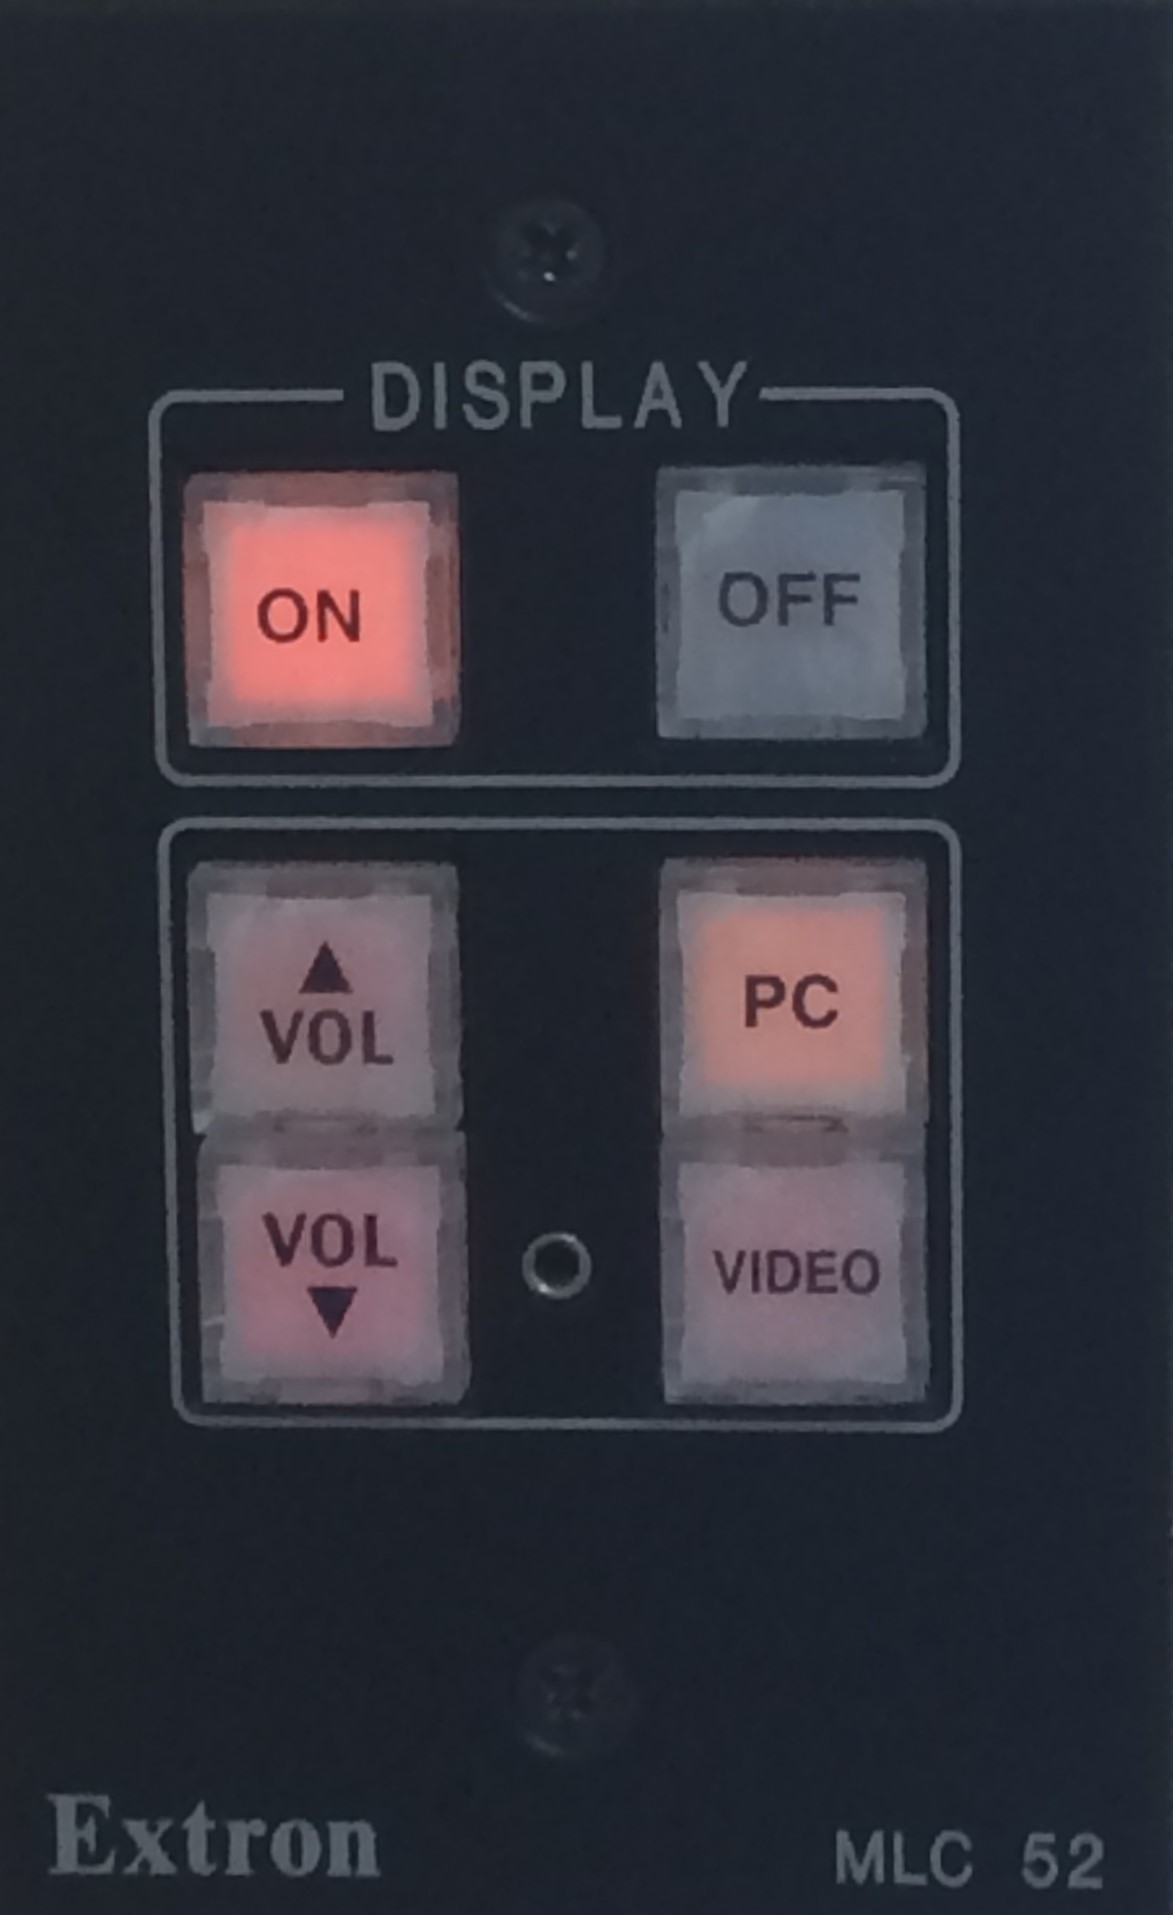
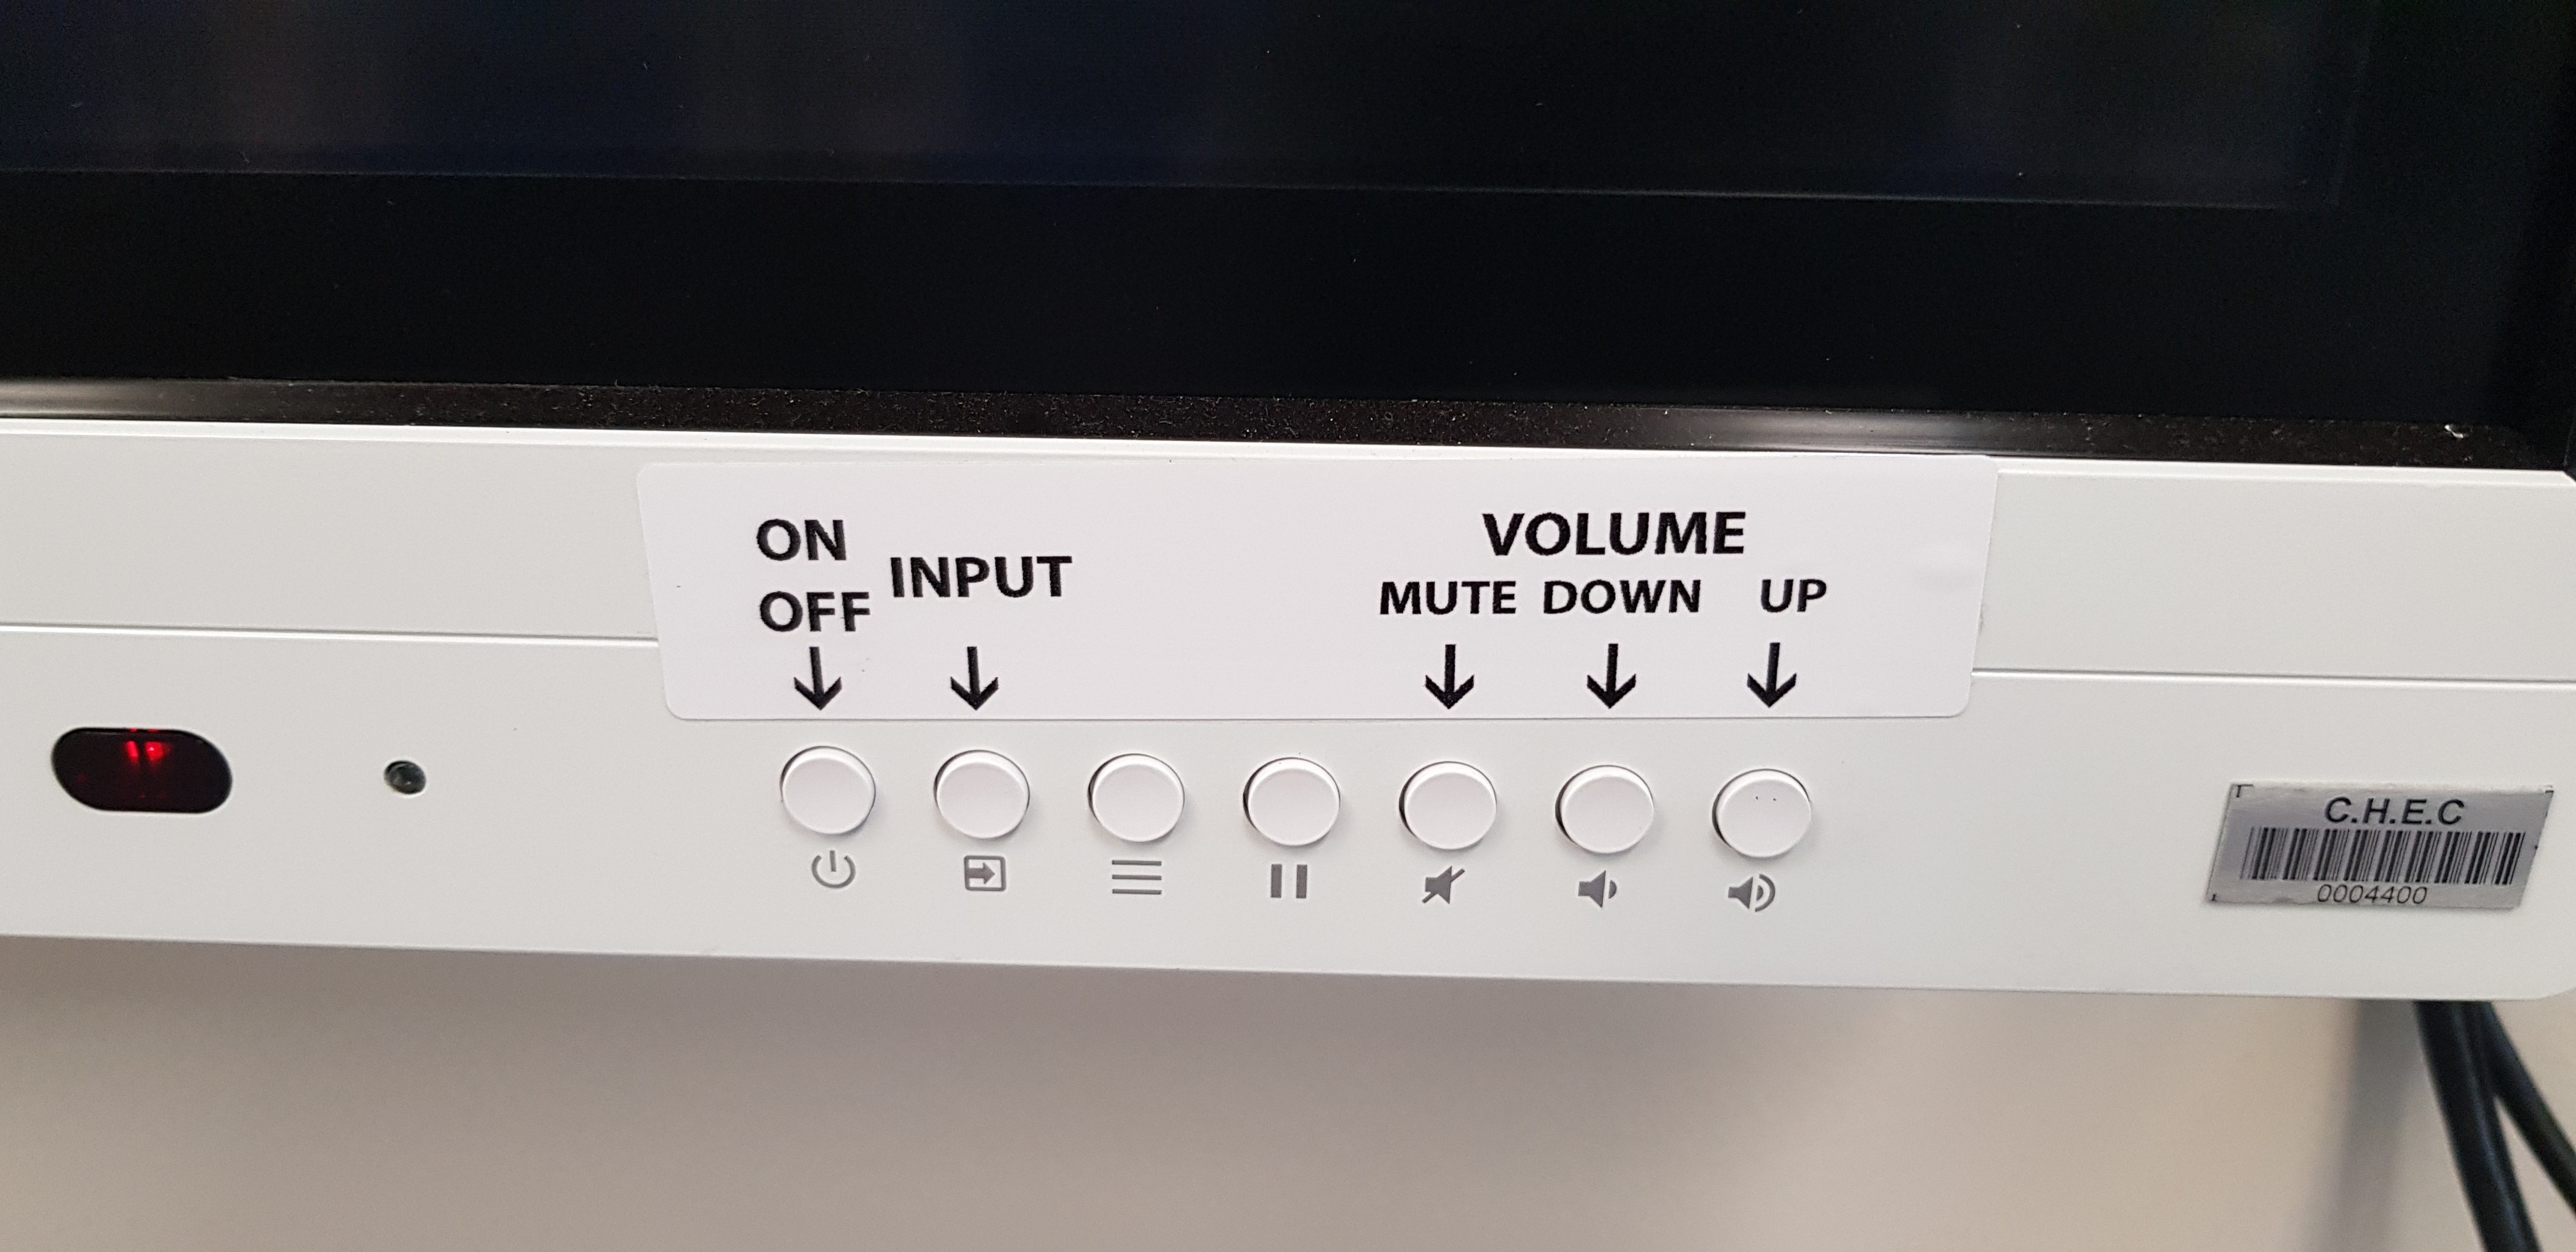
Controls
The power, input source and volume controls are operated via physical buttons positioned on the front-bottom-right of the display.
 OR
OR 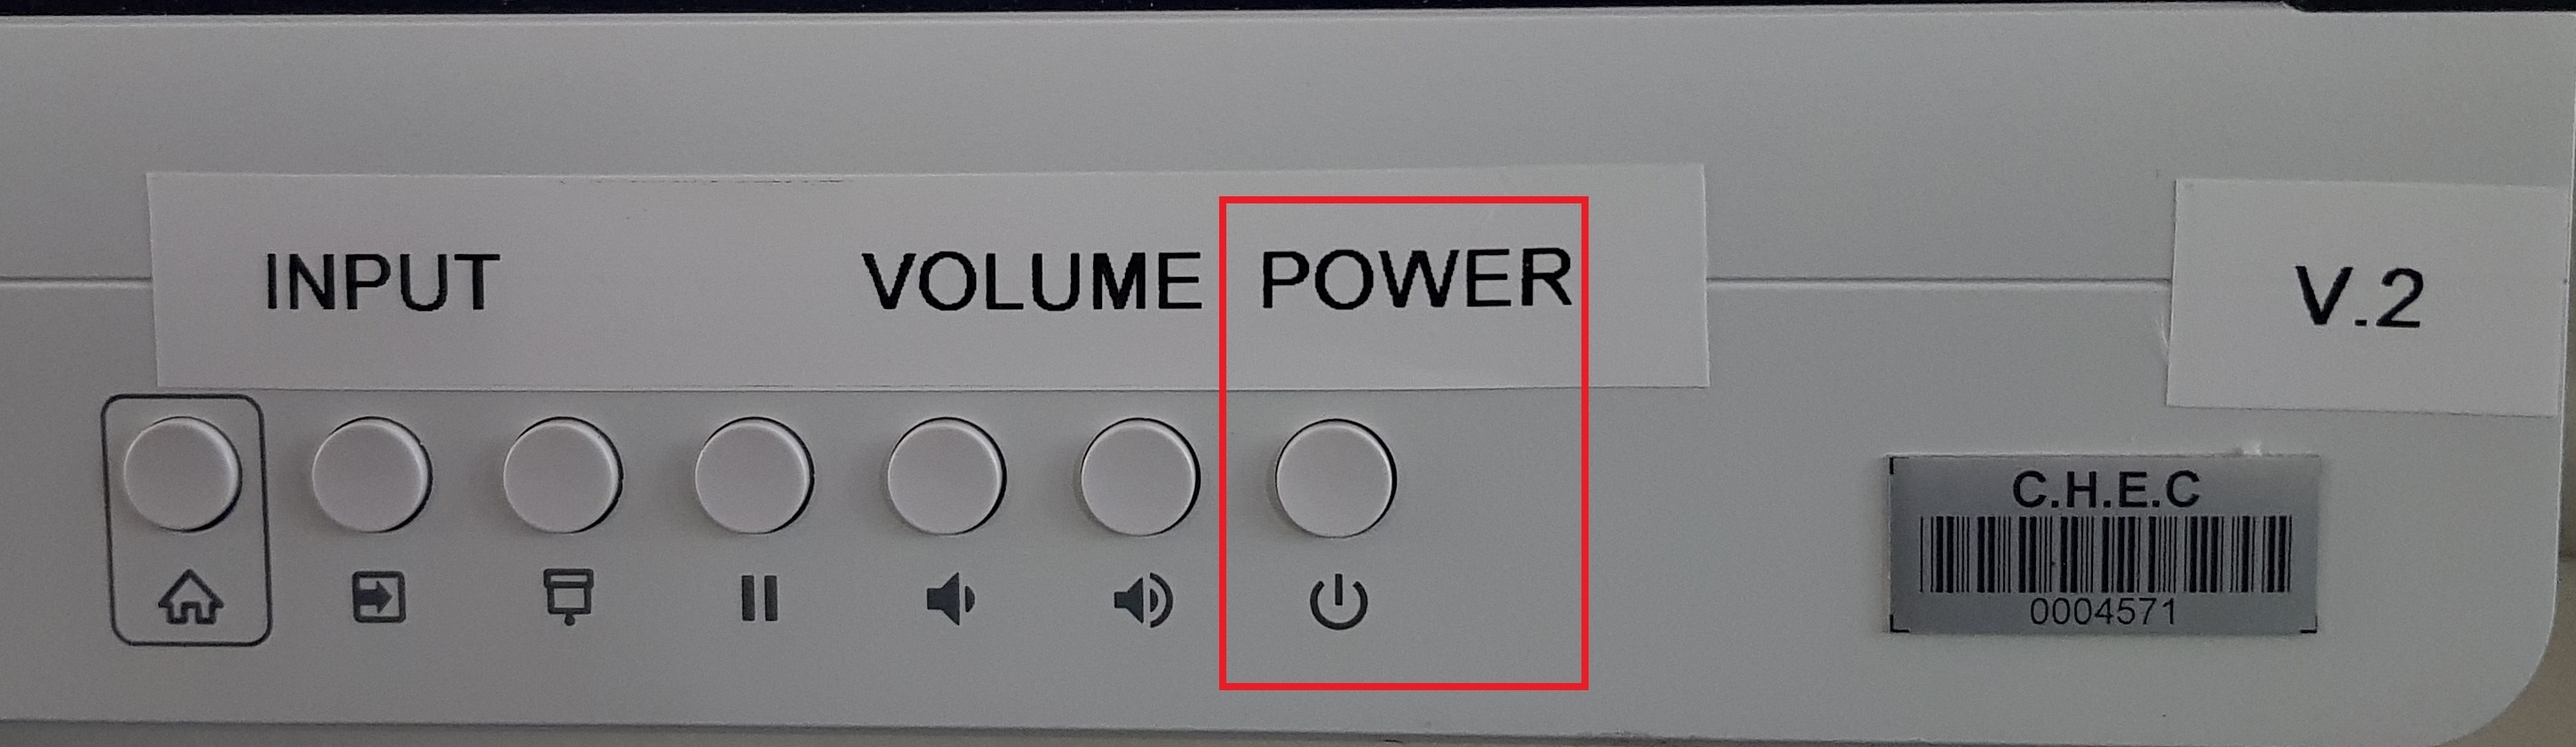
Version 1 Control Panel Version 2 Control Panel (Power Button opposite end to Version1)
Supplied
The following cabling interface is supplied via AV wall panel outlets
- HDMI
- VGA with audio
- USB (for touch)
Pen is also supplied however if it's missing please contact the Service Desk
How To Connect
Step 1: Connect your laptop using the cables provided
Step 2: Press the ON button
Step 3: Select your input eg HDMI or VGA etc using the INPUT button
Step 4: Turn on the computer

Solution 1:
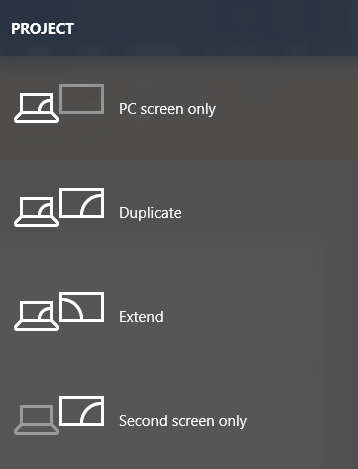
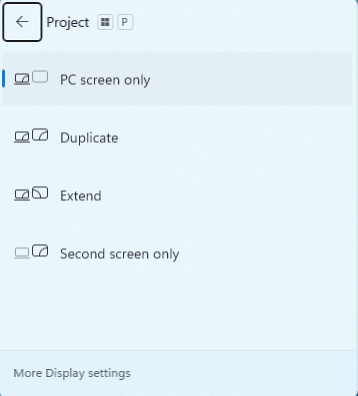
Windows Key + P, then select Duplicate
Solution 2:
If it is just a blue screen check that it is switched to the correct input source using the wall controller
Solution 3:
- Right mouse click on the desktop
- Select screen resolution
- Adjust screen resolution to 1920 x 1080
- Click on the Apply, the OK button
Solution 4:
If you’re running a Microsoft Powerpoint presentation, turn Presenter View off
End Slide Show, go to the Slide Show tab and un-tick Use Presenter View, the Start Slide Show From Beginning

Check to see if the power button (looks like a light switch) near the cable inputs on the wall is off.

Otherwise please call Service Desk, under no circumstances attempt to alter any of the setup.
Campus : CHEC Room: A109
| |
|---|---|
| Capacity: 45 | |
Hybrid / Collaboration Activated
|


| Facilities | Detail |
|---|---|
| 2 x Projectors (FHD) |
| Dual Monitors |
|
|
| Music Playback from BYOD (Phone) |
| |
| For use with Zoom / MS Teams |
| 1 x Lectern Mic 1 x Wireless Hand Held Mic 1 x Wireless Lapel Mic |
| Infrared System - Receivers available from the Student Learning Centre (E.G.19) |
| |
|


Use the AV Touch panel to Control room Technology (Located on Lectern)


1 -Quick Start Menu (Turn ON)

1 - Main Menu Navigation
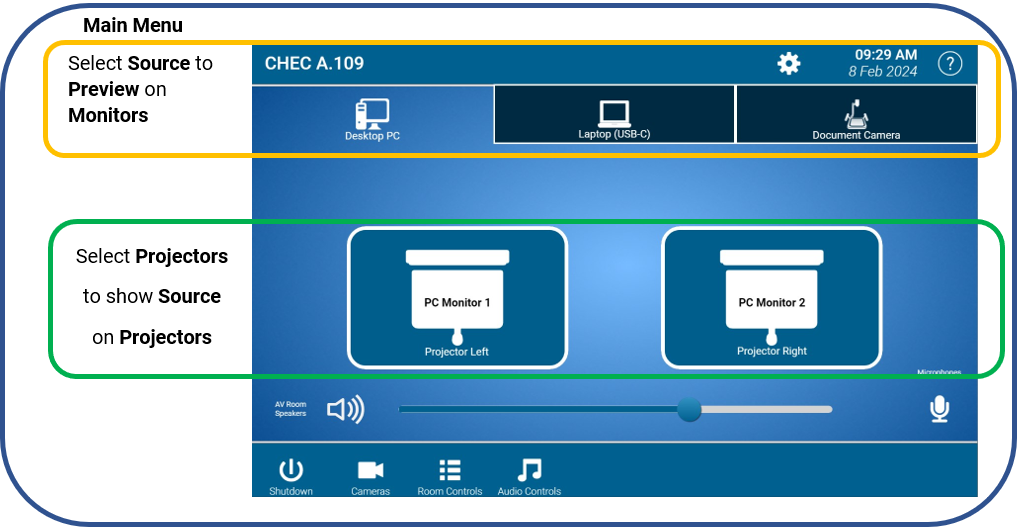
2 - Display Options
Custom display layouts can be achieved
E.g. MS PowerPoint Presenter mode: Show 1 monitor on Both Projectors to keep notes private
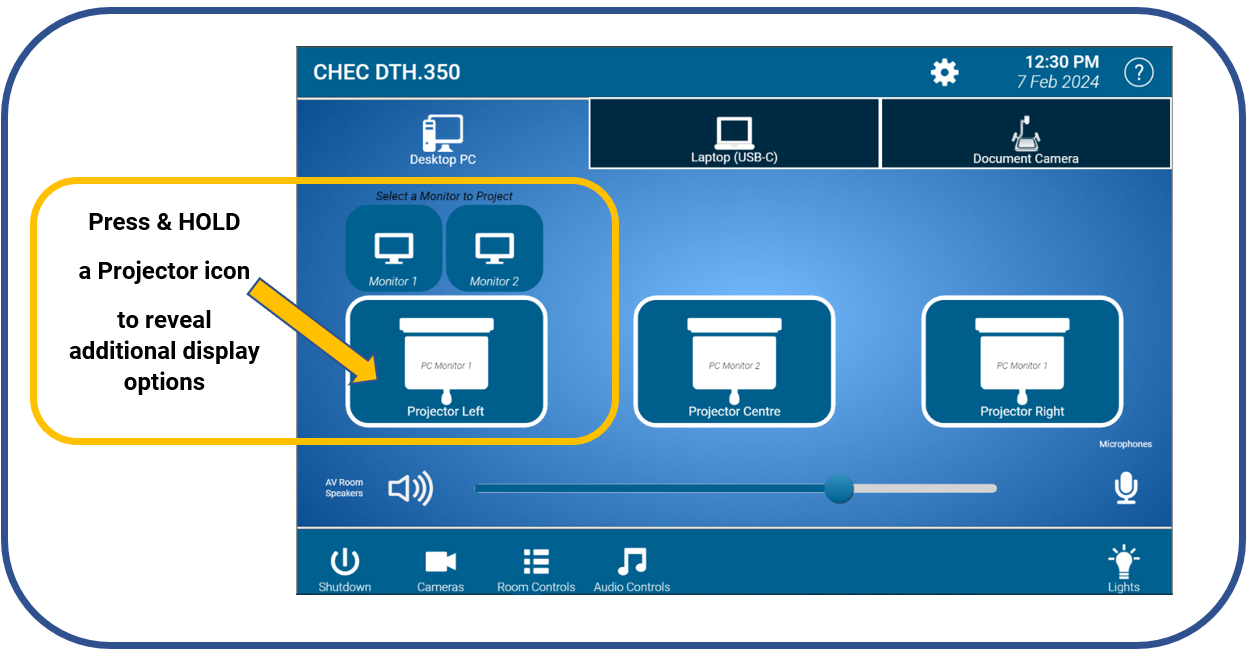
- Press and & Hold the Project Button.
- Select Monitor 1 or Monitor 2.
- This will Project the content currently displayed on the selected monitor.

1 - Laptop Connectivity
Connect your Laptop using the supplied cable:
- USB-C Cable
Or
2.HDMI Cable
| Conection Type | Functionality Provided to connected laptop |
|---|---|
|
|
|
|
IMPORTANT! Only 1 Cable type should be connected to a laptop
If both cables have been connected:
a) Remove both cables and only attach the 1 cable
b) Re-select the Laptop Project buttons on the AV touch panel
1 - Device Selection
The AV System provides camera and Microphone integration for use with Zoom & MS Teams on the following devices:
- Teaching PC
- Laptop USB-C Connection
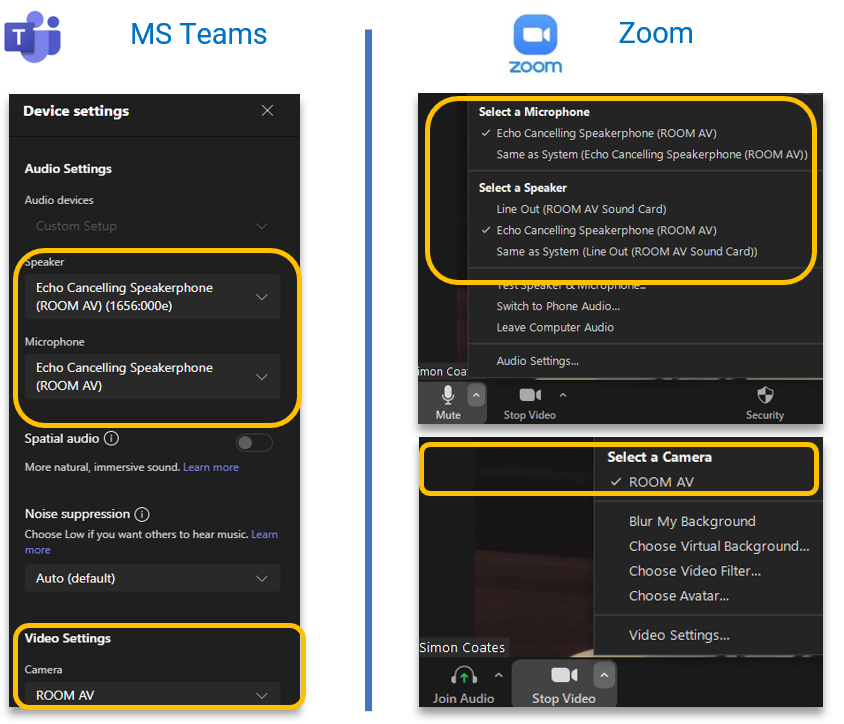
Correct USB Speaker, Microphone and Camera Devices must be selected within the application utilised.
| Device | Selection |
|
|---|---|---|
| Speaker Device | Room AV | |
| Microphone Device | Room AV | |
| Camera Device | Room AV |
1 - Camera Selection and Control
- Select the camera icon from the Main Touch panel menu (bottom right):

- The Camera menu will appear.
- Selecting a camera will change the camera shown in a Zoom / MS Teams call.
- Use the Zoom in/out and Direction controls to move/position the Camera show as required.
- Press and Hold the Preset Buttons to Store new position presets:


1 - Audio and Microphone Controls
- AV volume (PC/Laptop) control is located on the Main Menu Page of the AV Touch Panel.
- Microphone Mute/Unmute control is located on the Main Menu Page of the AV Touch Panel.
- All Microphones are controlled from the 1 Microphone Mute/Unmute button.
.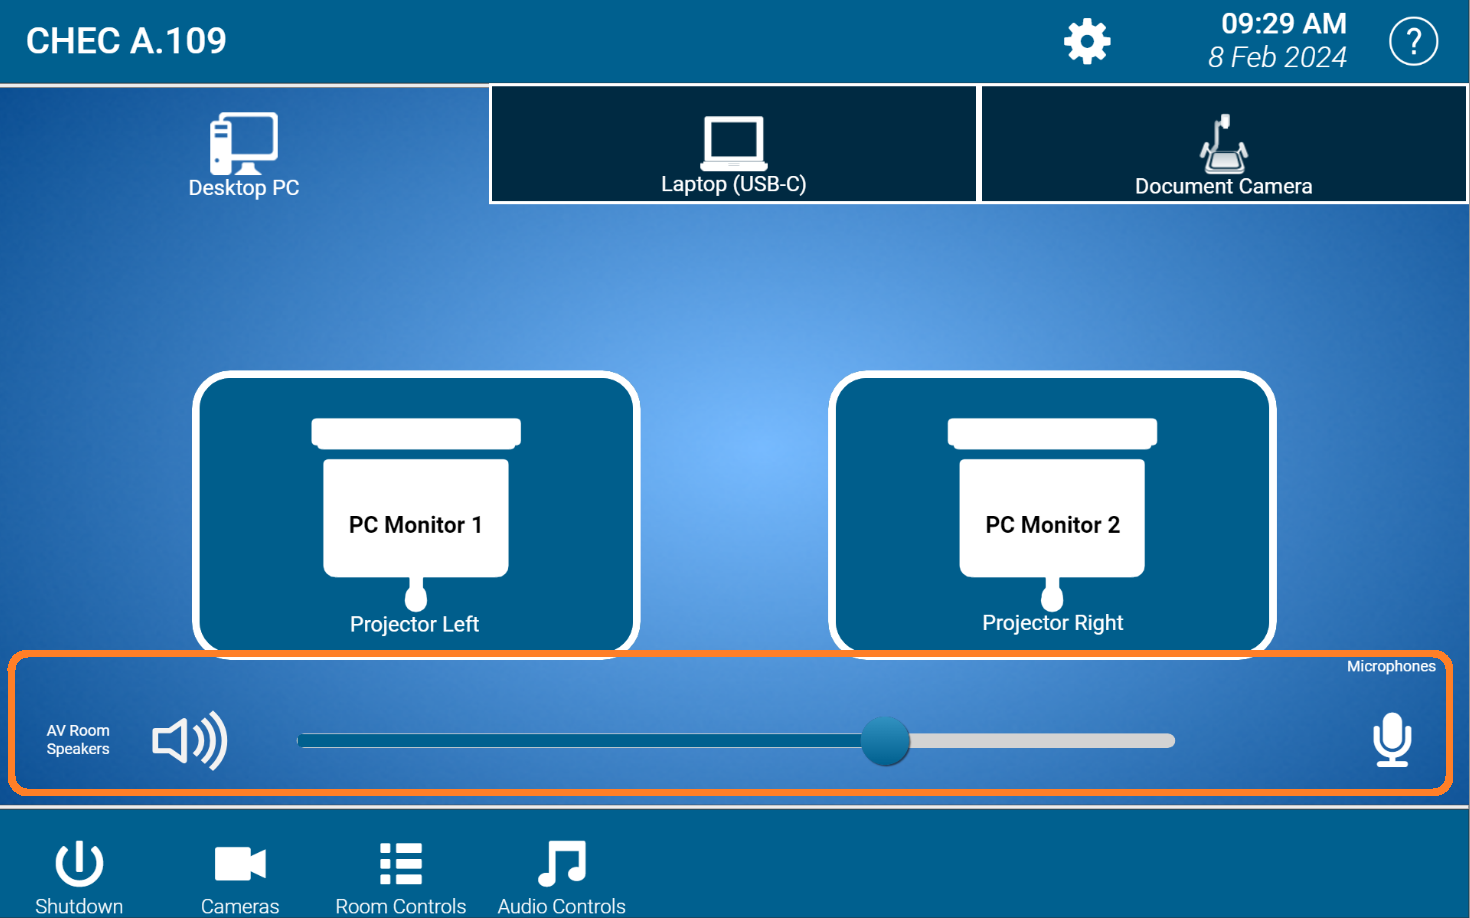
2 - Microphone Volume
- Access Microphone volume Control from the Audio Controls button (located bottom right of touch panel).

- Adjust Microphone volume using the slider - This will adjust the volume of all microphones.

- NOTE: the microphones volume control does not affect microphone volume in a Zoom / MS Teams Call,
it is for Local room voice amplification only. It does not need to be turned up for use in Zoom/ MS Teams.
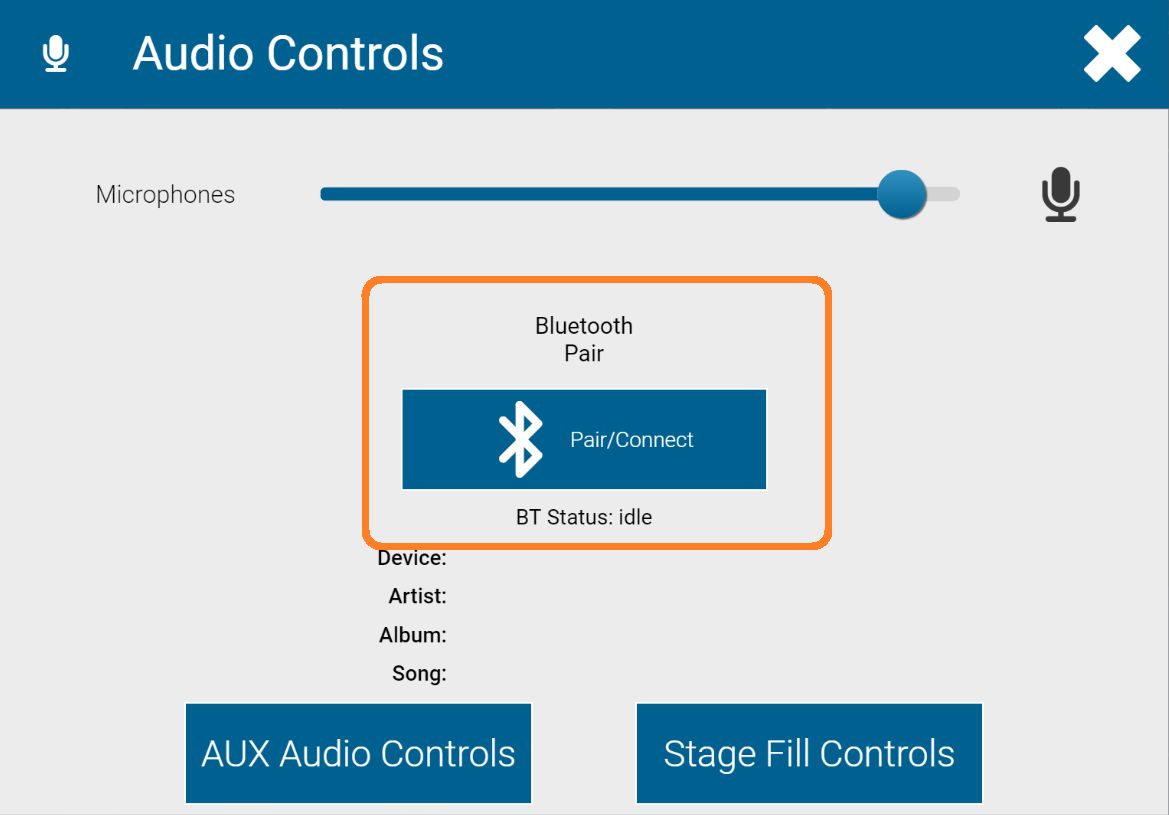
1 - Bluetooth Connectivity
- Bluetooth connectivity is provided to playback music from phones or other devices.
- Access the Audio Controls page to Pair a device:
- Press "Pair/Connect" Button
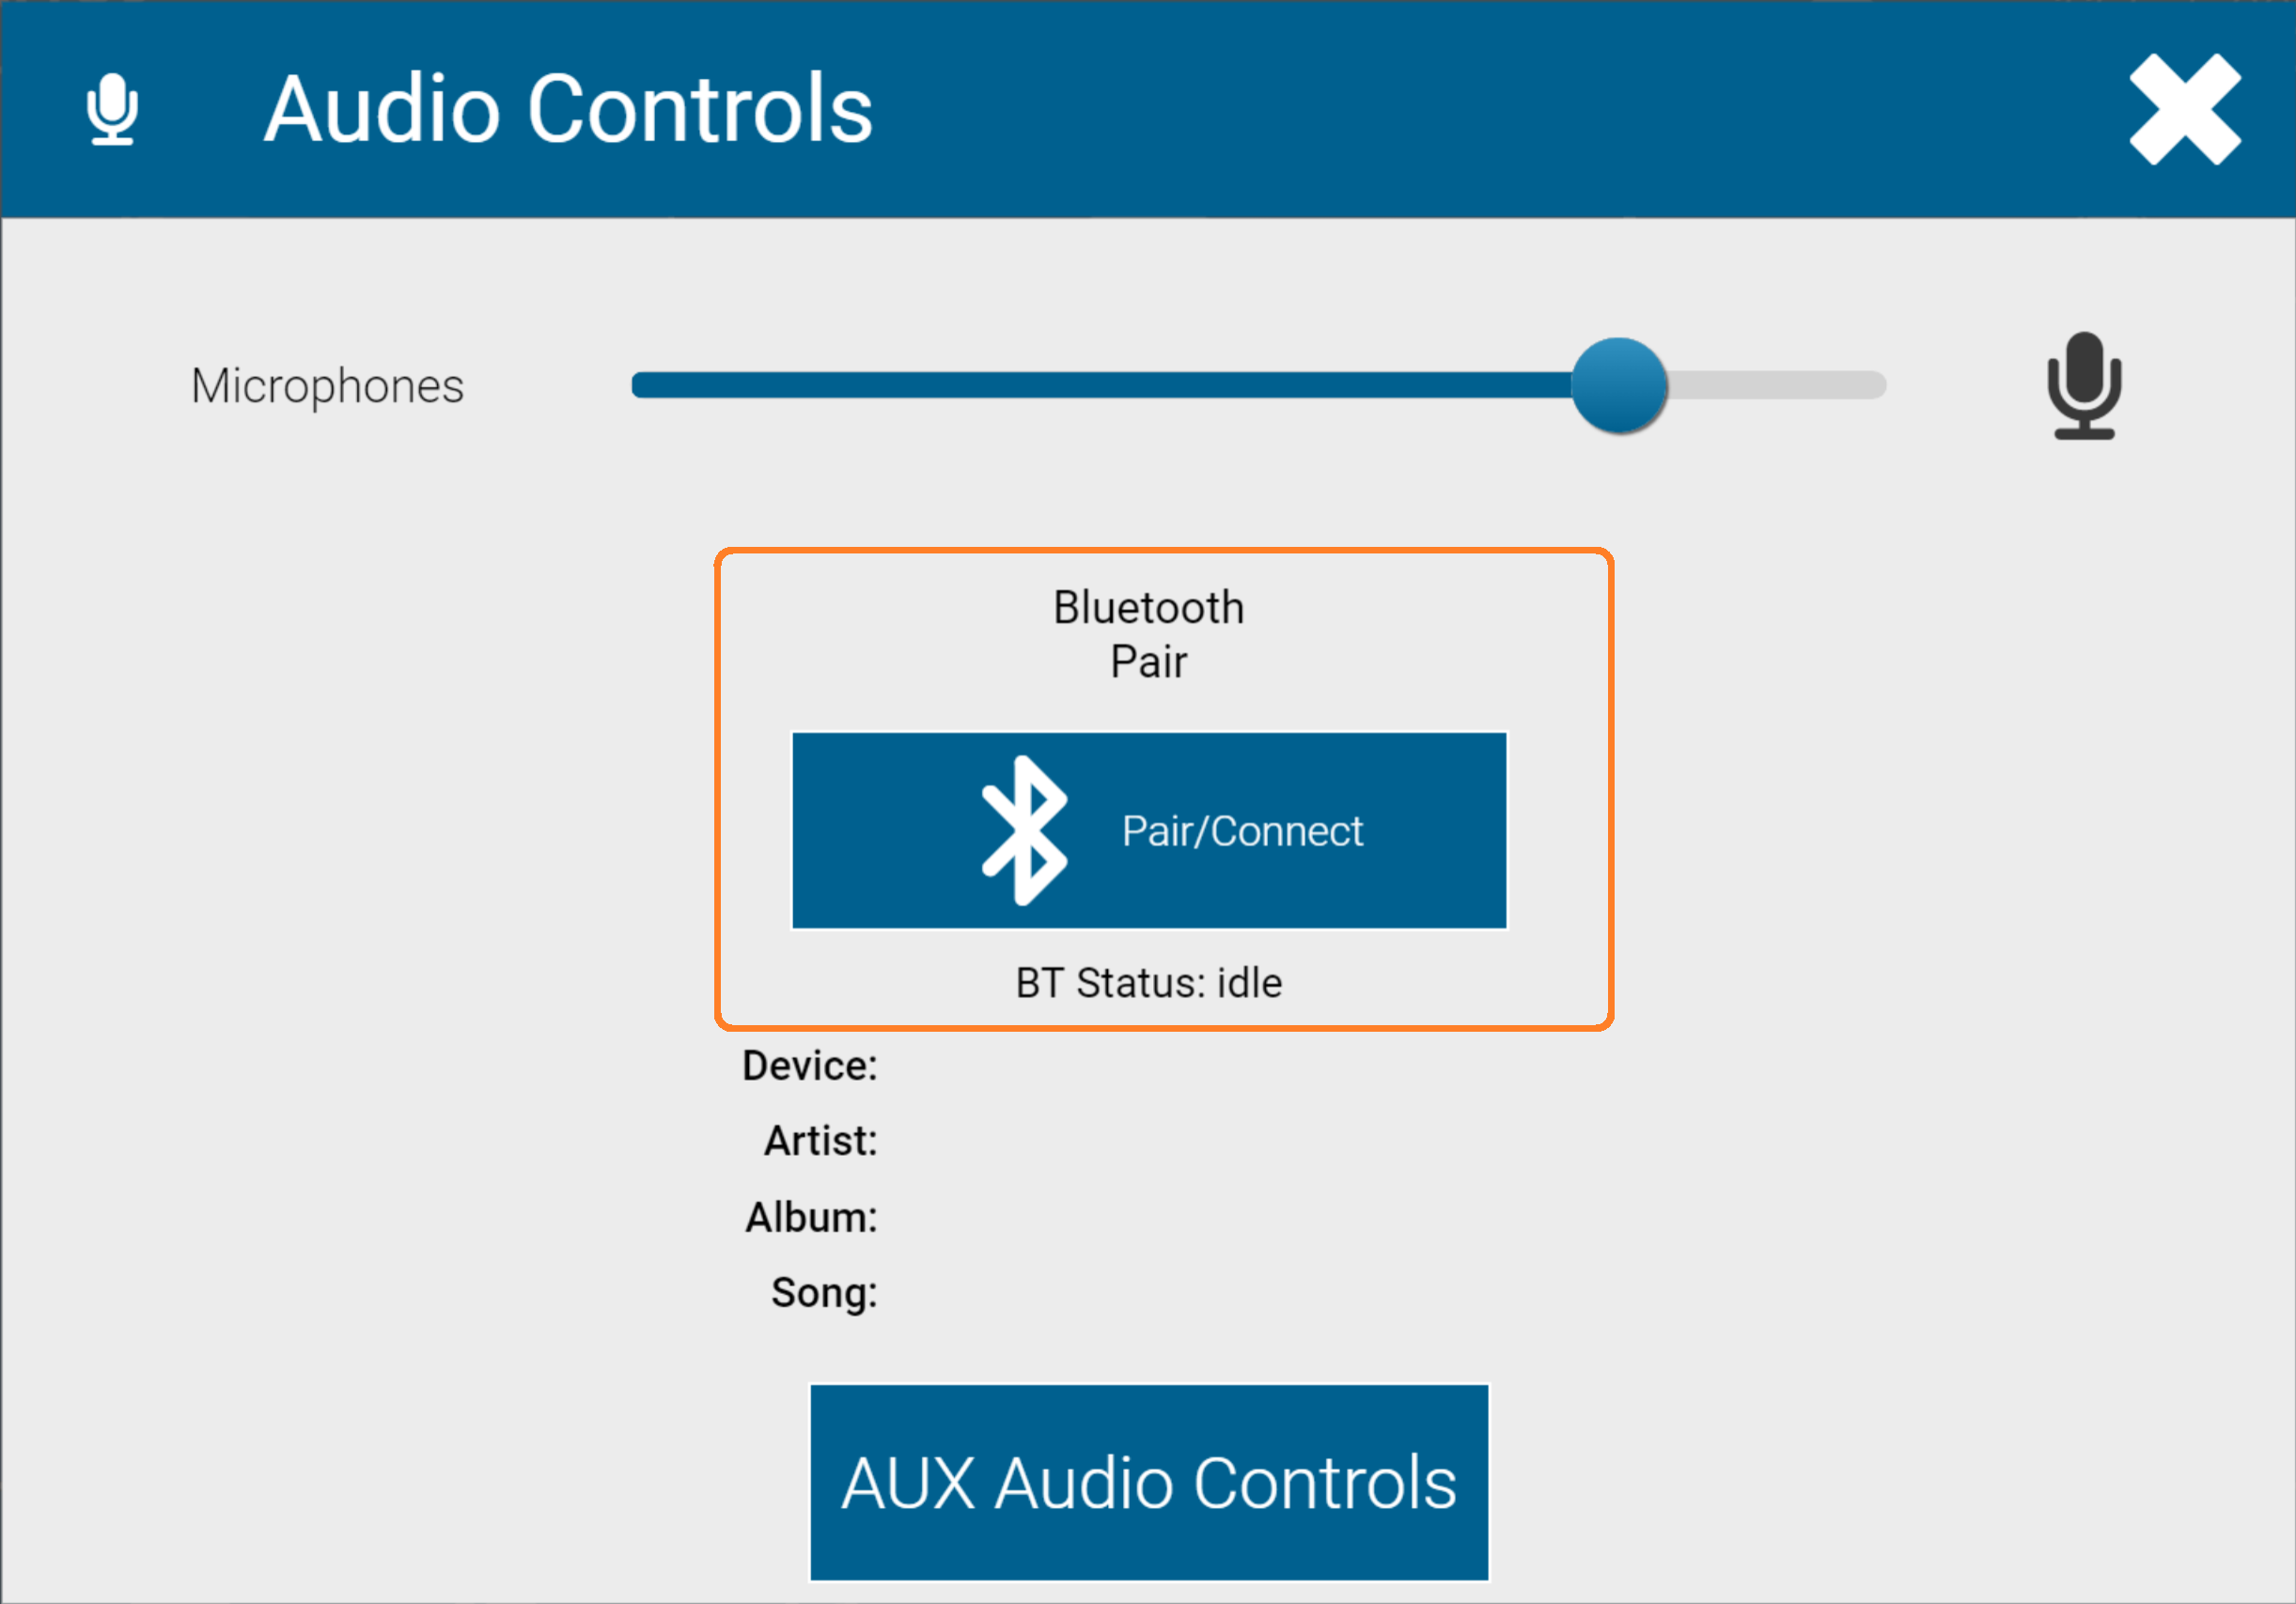
- Search for the "Room Name-Bluetooth" on your device to connect e.g "A109-Bluetooth"
- You have 60 seconds to complete the pair process, pressing the connect button will start the pairing process again.
Notes:
- When the AV system is shut down, bluetooth will disconnect
- The Pair process will need to be completed each time bluetooth is required - It will not remember devices by design
Apple/Mac Dual Screen - USB-C
- Apple/Mac Laptops connected via the USB-C cable may need to install DisplayLink macOS Software to enable dual monitor output to the AV system
- DisplayLink macOS Software can be downloaded from here https://www.synaptics.com/products/displaylink-graphics/downloads/macos
1 - Duplicate / Extend Windows Desktop
Microsoft Windows Display Layouts can be changed on the dual monitors
Windows Key + P, then select Duplicate
2 - Power Point Presenter Mode
1. Use PowerPoint Presenter mode and Hide notes on Projectors (Display Notes on Preview Monitors only)
Goto the Slide Show tab and tick Use Presenter View, Start Slide Show From Beginning
2. ON the AV touch panel Press and Hold on the Project buttons to reveal which monitor to show on the projector
- Select the monitor that is showing the presentation only
- Repeat for both projectors as required:
Apple/Mac Dual Screen - USB-C
- Apple/Mac Laptops connected via the USB-C cable may need to install DisplayLink macOS Software to enable dual monitor output to the AV system
- DisplayLink macOS Software can be downloaded from here https://www.synaptics.com/products/displaylink-graphics/downloads/macos
1 - Laptop Connectivity Options
Connect Your Laptop using the supplied cable:
- USB-C Cable
Or
2.HDMI Cable
| Connection Type | Functionality Provided to connected laptop |
|---|---|
|
|
|
|
IMPORTANT! Only 1 Cable type should be connected to a laptop
If both cables have been connected:
a) Remove both cables and only attach the 1 cable
b) Re-select the Laptop Project buttons on the AV touch Panel
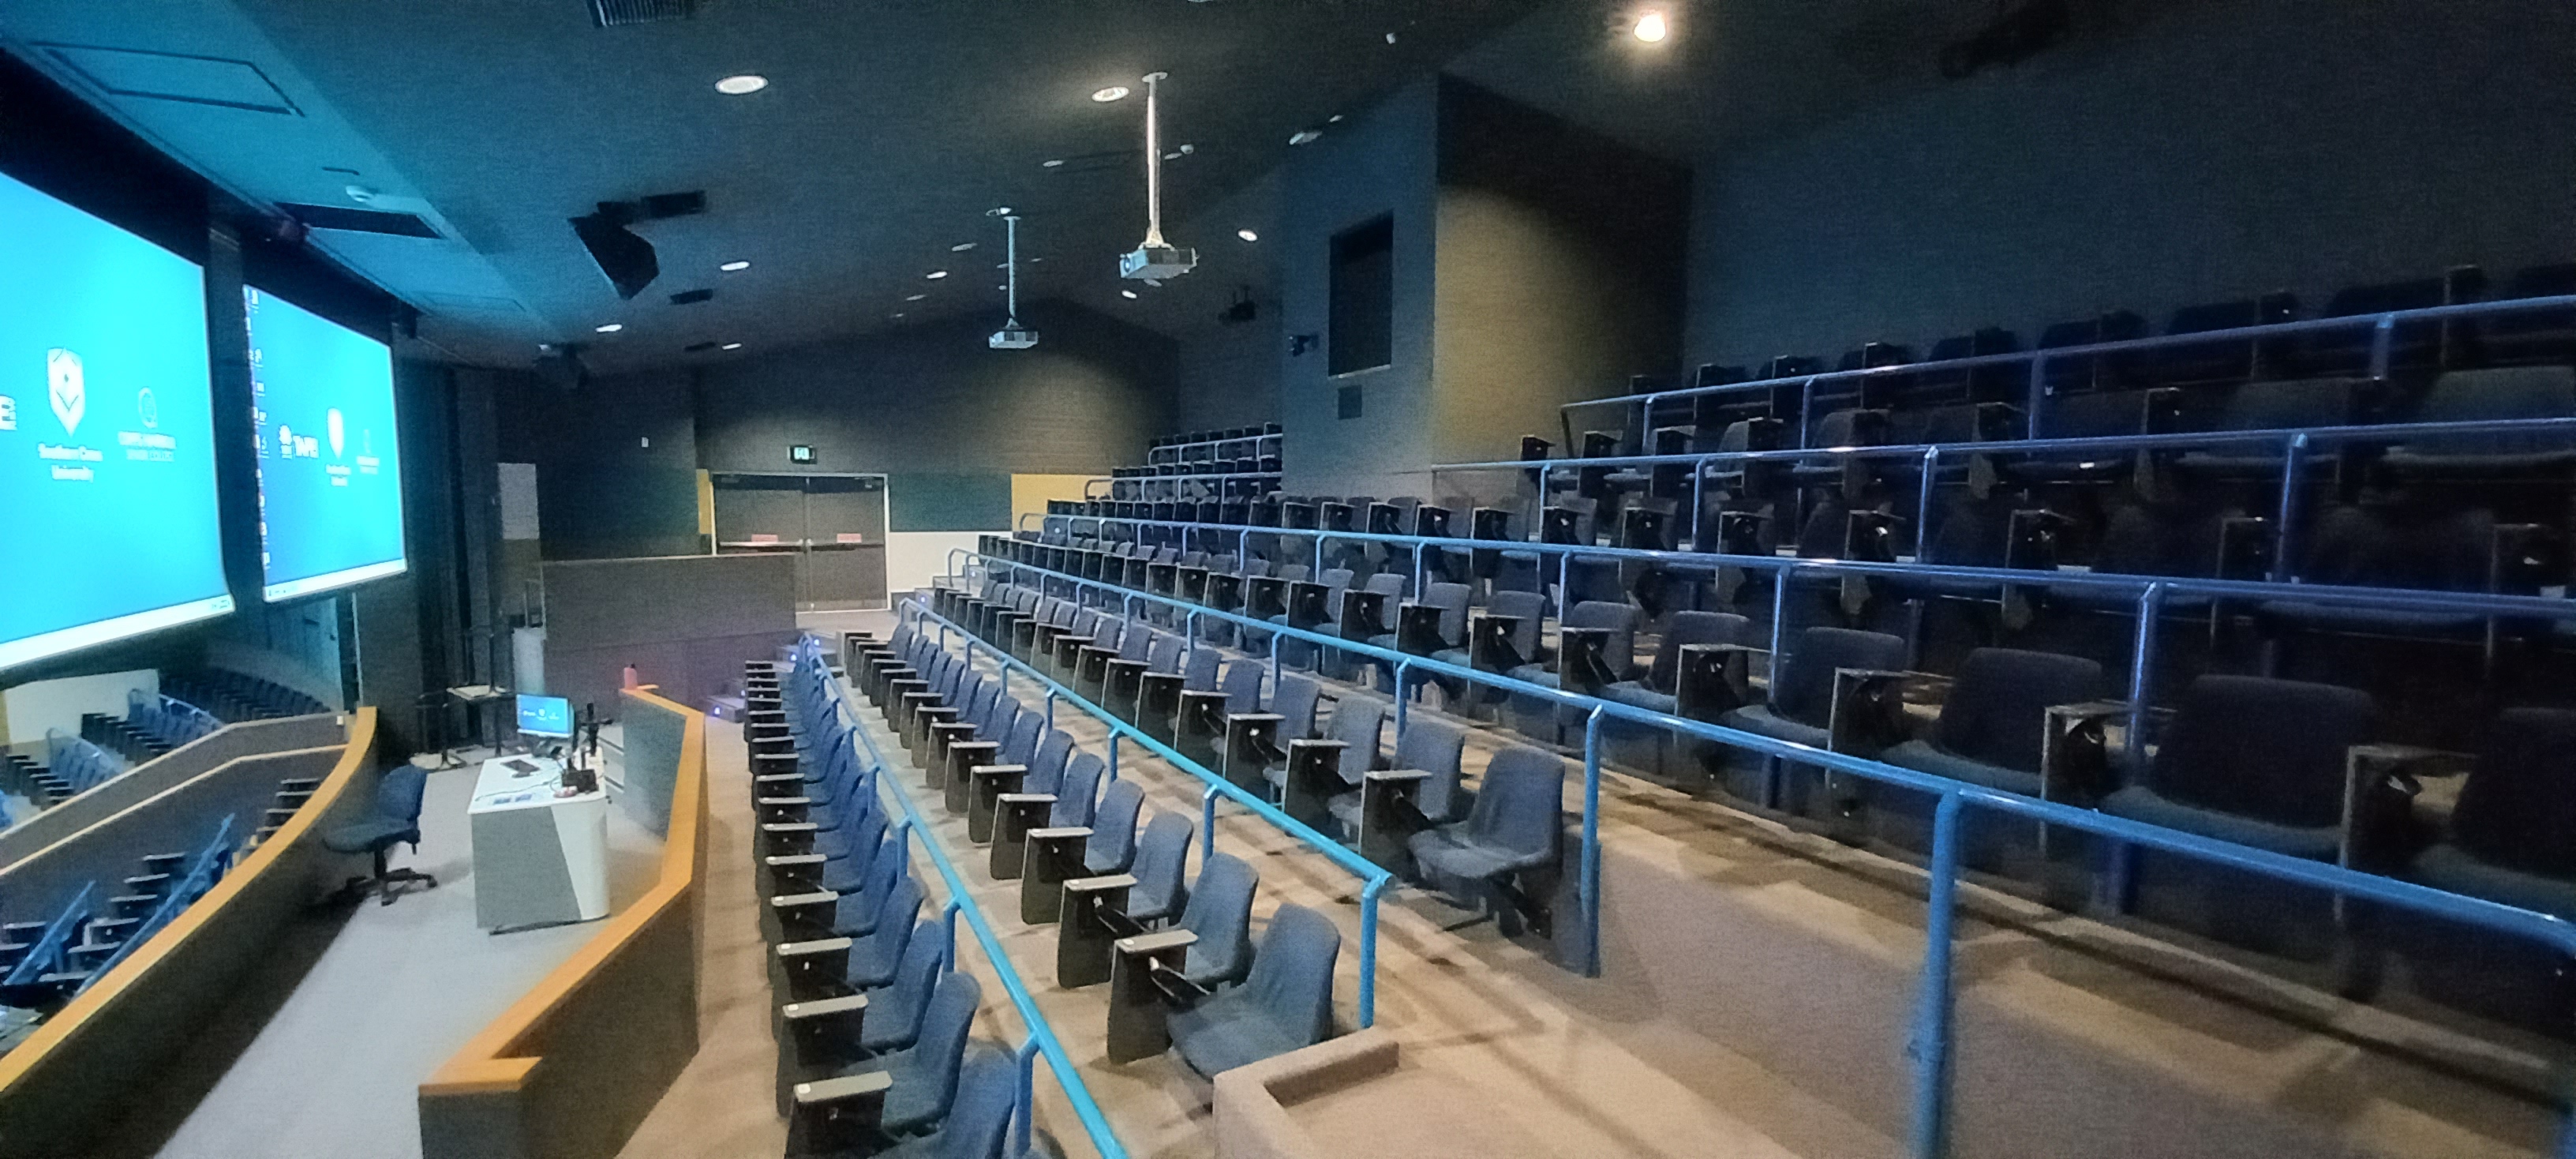
Campus : CHEC Room: DTH.150 (D Theatre)
| |
|---|---|
| Capacity: 150 | |
Hybrid / Collaboration Activated
|
| Facilities | Detail |
|---|---|
| 2 x Projectors |
| Dual Monitors |
|
|
| Music Playback from BYOD (Phone) |
| |
| For use with Zoom / MS Teams |
| 1 x Lectern Mic 3 x Wireless Hand Held Mic 1 x Wireless Lapel Mic (Additional Mics upon Request) |
| Infrared System - Receivers available from the Student Learning Centre (E.G.19) |
|
Use the AV Touch panel to Control room Technology (Located on Lectern)

1 -Quick Start Menu (Turn ON)
1 - Main Menu Navigation
2 - Display Options
Custom display layouts can be achieved
E,g, PowerPoint Presenter mode: Show 1 monitor on Both Projectors to keep notes private.
- Press and & Hold the Project Button.
- Select Monitor 1 or Monitor 2.
- This will Project the content currently displayed on the selected monitor.
1 - Laptop Connectivity
Connect Your Laptop using the supplied cable:
- USB-C Cable
Or
2.HDMI Cable
| Connection Type | Functionality Provided to connected laptop |
|---|---|
|
|
|
|
IMPORTANT! Only 1 Cable type should be connected to a laptop
If both cables have been connected:
a) Remove both cables and only attach the 1 cable.
b) Re-select the Laptop Project buttons on the AV touch Panel.
1 - Device Selection
The AV System provides camera and Microphones integration for use with Zoom & MS Teams on the following devices:
- Teaching PC.
- Laptop USB-C Connection.
Correct USB Speaker, Microphone and Camera Devices must be selected within the application utilised.
| Device | Selection |
|
|---|---|---|
| Speaker Device | Room AV | |
| Microphone Device | Room AV | |
| Camera Device | Room AV |
1 - Camera Selection and Control
- Select the camera icon from the Main Touch panel menu (bottom right):
- The Camera menu will appear.
- Selecting a camera will change the camera shown in a Zoom / MS Teams call.
- Use the Zoom in/out and Direction controls to move/position the Camera show as required.
- Press and Hold the Preset Buttons to Store new position presets:
1 - Audio and Microphone Controls
- AV volume (PC/Laptop) control is located on the Main Menu Page of the AV Touch Panel.
- Microphone Mute/Unmute control is located on the Main Menu Page of the AV Touch Panel.
- All Microphones are controlled from the 1 Microphone Mute/Unmute button.
2 - Microphone Volume
- Access Microphone volume Control from the Audio Controls button (located bottom right of touch panel).
- Adjust Microphone volume using the slider - This will adjust the volume of all microphones.
- NOTE: the microphones volume does not affect microphone volume in a Zoom/ MS Teams Call
it is for Local room voice amplification only. It does not need to be turned up for use in Zoom/ MS Teams.
1 - Bluetooth Connectivity
- Bluetooth connectivity is provided to playback music from Phones or other Devices.
- Access the Audio Controls page to Pair a device:
- Press "Pair/Connect" Button.
- Search for the "Room Name-Bluetooth" on your device to connect e.g "A109-Bluetooth"
- You have 60 seconds to complete the pair process, pressing the connect button will start the pairing process again.
Notes:
- When the AV system is shut down, bluetooth will disconnect.
- The Pair process will need to be completed each time bluetooth is required - It will not remember devices by design.
1 - Room Lighting
Room Lighting can be adjusted at the Lectern.
Press the  button located in the bottom right of the AV touch panel.
Adjust room lighting to requirements.
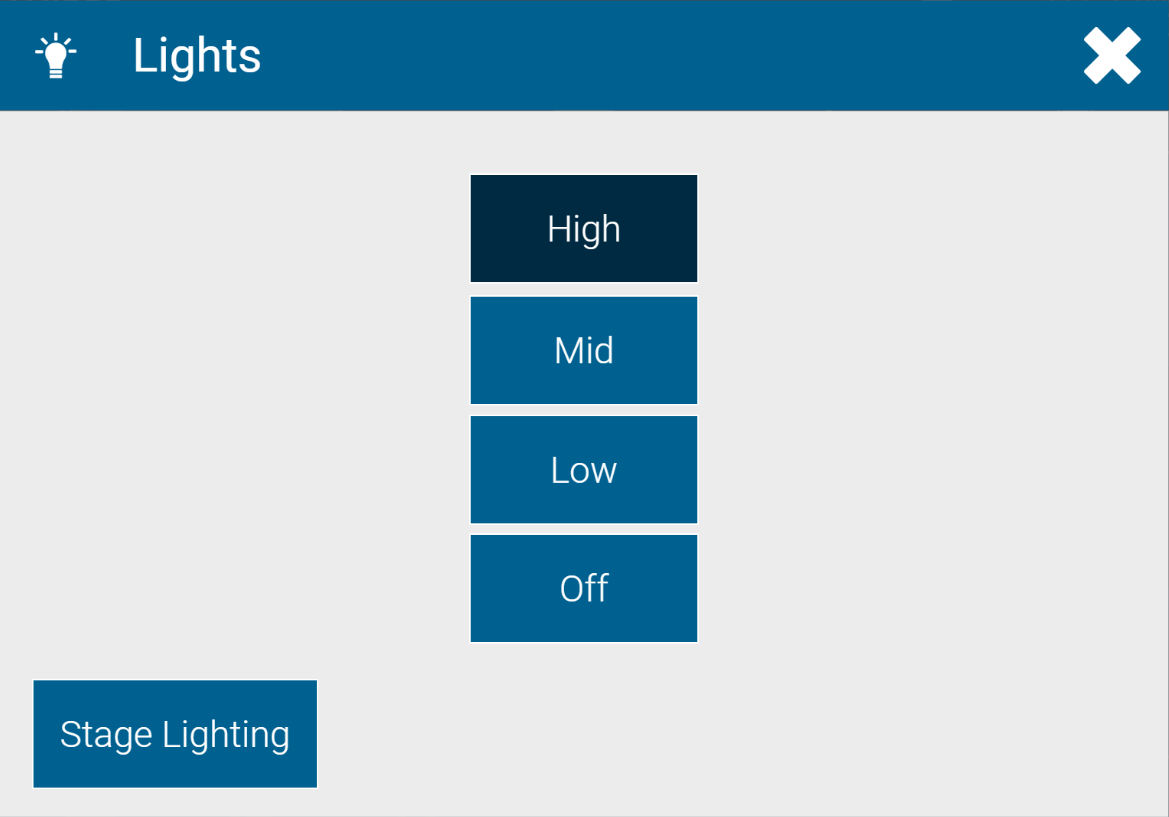
1 - Stage Lighting Control
Stage lighting control is available from the Lights page.
- Press the button located in the bottom right of the AV touch panel.
- Press the
 button.
3. Select the "ON" button to illuminate the lectern area.
Lighting can be dimmed up and down using the arrow buttons

1 - Manual Project/Screen Control
Projectors and screens can be manually operated via the "Room Control" Page.
- Select the Room Controls Icon from the bottom of the AV Touch Panel.

2. Select a projector to manually operate projector and screen.
Apple/Mac Dual Screen - USB-C
- Apple/Mac Laptops connected via the USB-C cable may need to install DisplayLink macOS Software to enable dual monitor output to the AV system
- DisplayLink macOS Software can be downloaded from here https://www.synaptics.com/products/displaylink-graphics/downloads/macos
1 - Duplicate / Extend Windows Desktop
Microsoft Windows Display Layouts can be changed on the dual monitors
Windows Key + P, then select Duplicate
2 - Power Point Presenter Mode
1 Use Power Point Presenter mode and Hide notes on Projectors (Display Notes on Preview Monitors only)
Goto the Slide Show tab and tick Use Presenter View, Start Slide Show From Beginning
2. ON the AV touch panel Press and Hold on the Project buttons to reveal which monitor to show on the projector.
- Select the monitor that is showing the presentation only.
- Repeat for both projectors as required:
Apple/Mac Dual Screen - USB-C
- Apple/Mac Laptops connected via the USB-C cable may need to install DisplayLink macOS Software to enable dual monitor output to the AV system
- DisplayLink macOS Software can be downloaded from here https://www.synaptics.com/products/displaylink-graphics/downloads/macos
1 - Laptop Connectivity Options
Connect Your Laptop using the supplied cable:
- USB-C Cable
Or
2.HDMI Cable
| Conection Type | Functionality Provided to connected laptop |
|---|---|
|
|
|
|
IMPORTANT! Only 1 Cable type should be connected to a laptop
If both cables have been connected:
a) Remove both cables and only attach the 1 cable.
b) Re-select the Laptop Project buttons on the AV touch Panel.
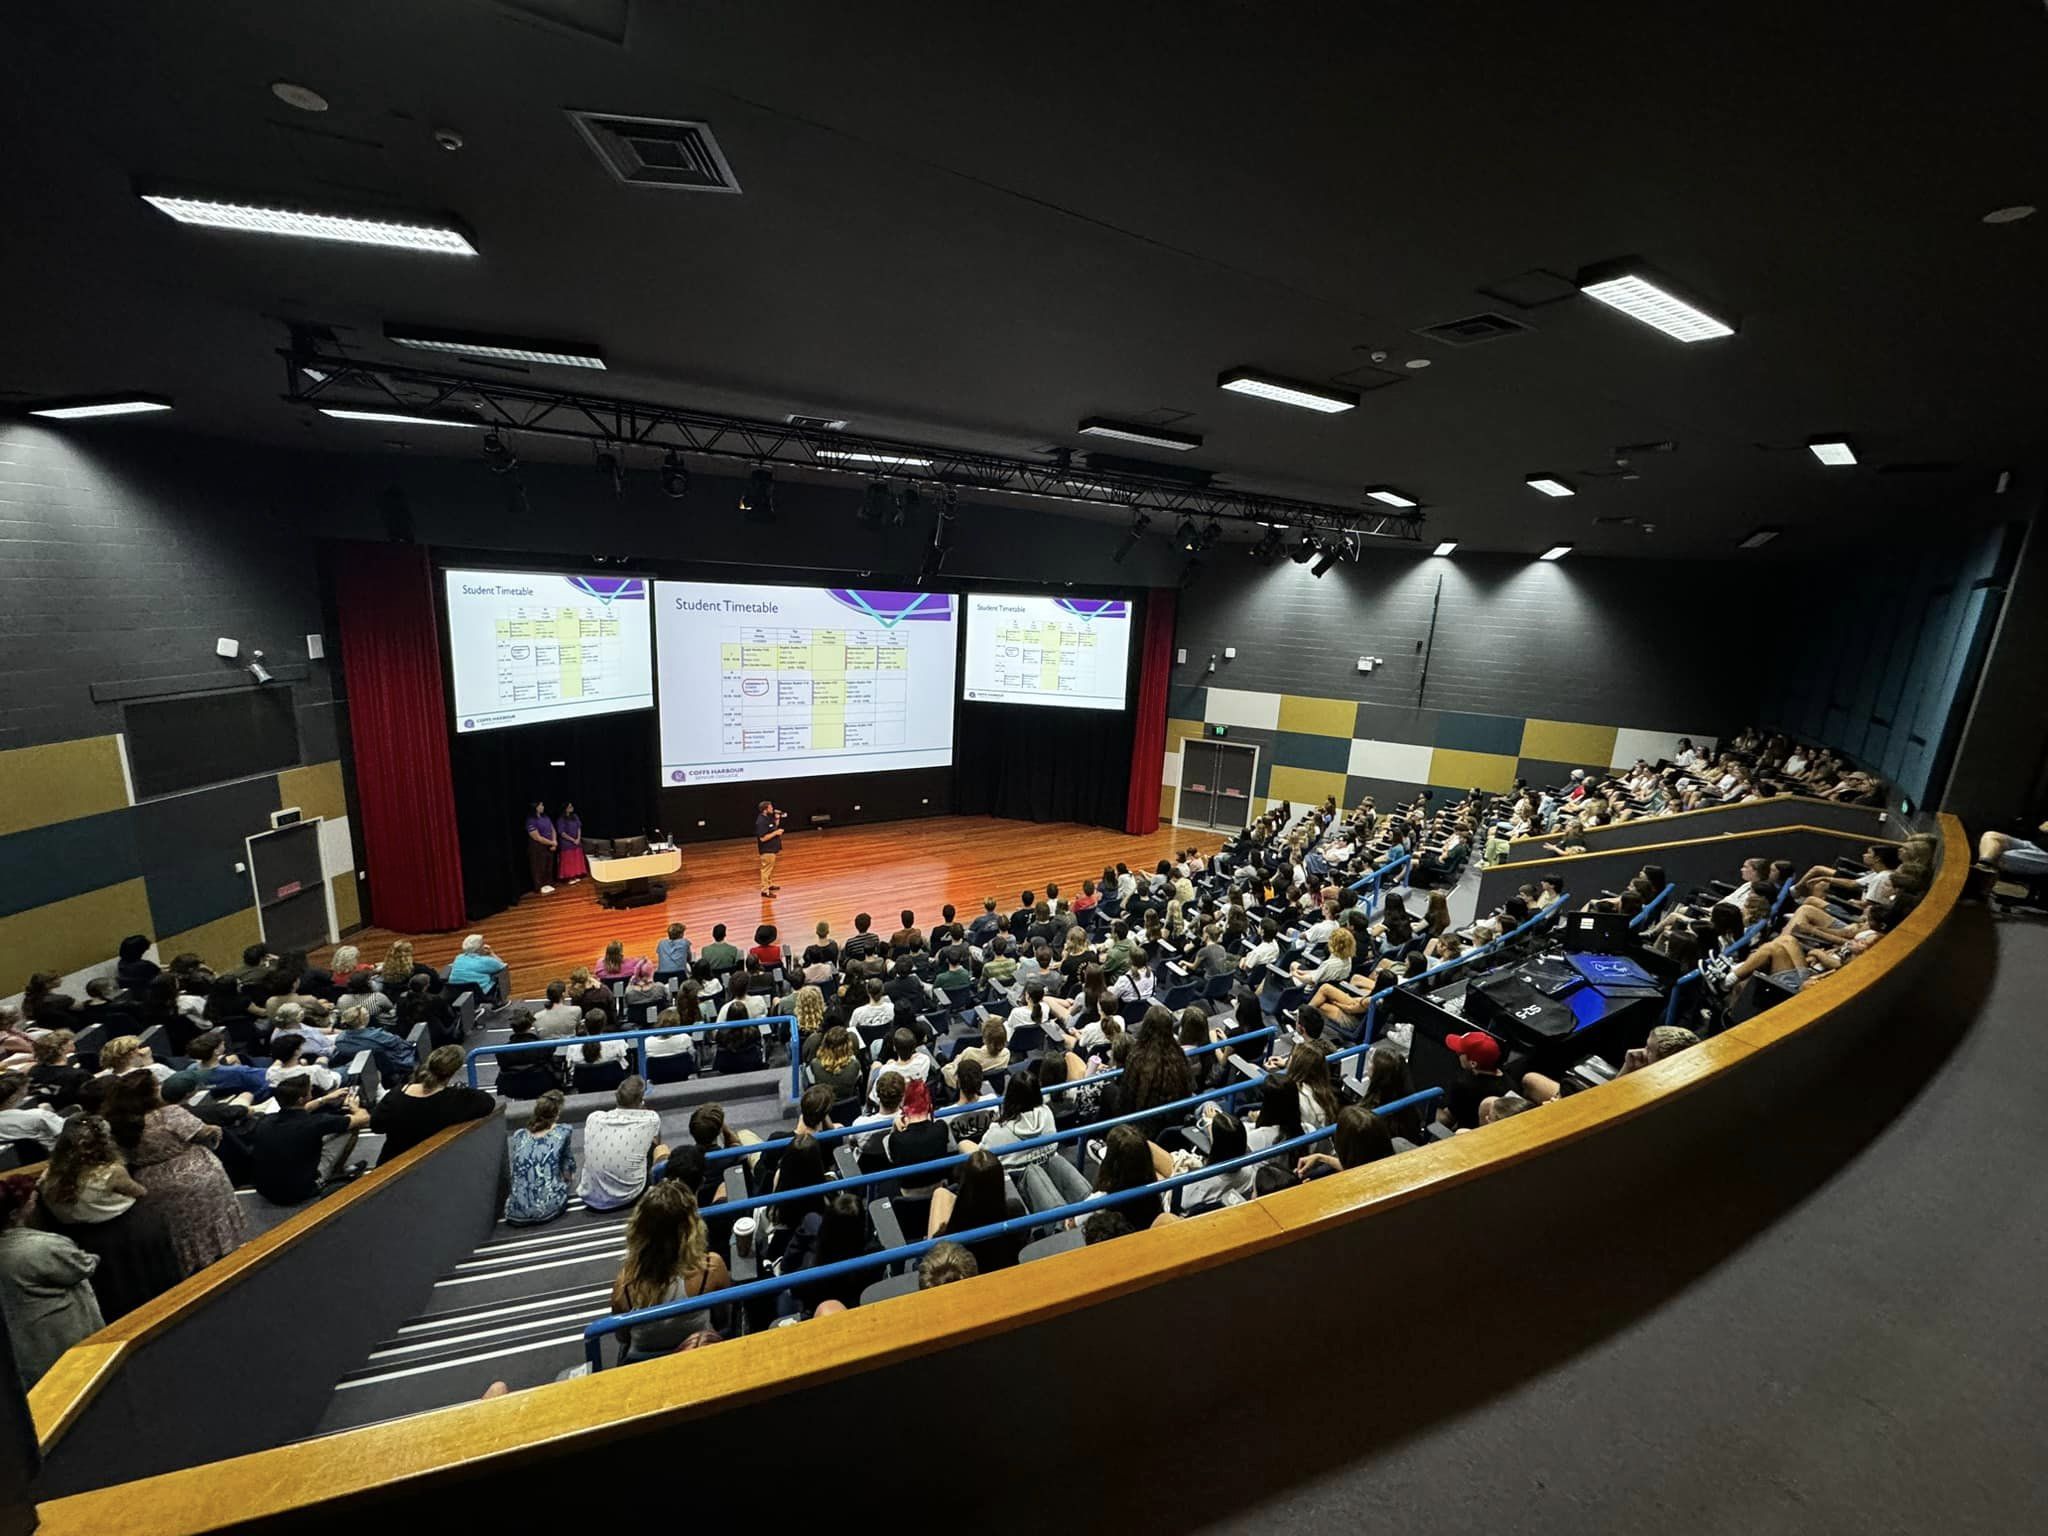
Campus : CHEC Room: DTH.350 / DTH.500
| |
|---|---|
| Capacity: 350 /500 | |
Hybrid / Collaboration Activated
|
| Facilities | Detail |
|---|---|
| 3 x Projectors (FHD) |
| Dual Monitors |
|
|
| Music Playback from BYOD (Phone) |
| |
| For use with Zoom / MS Teams |
| 1 x Lectern Mic 3 x Wireless Hand Held Mic 1 x Wireless Lapel Mic (Additional Mics upon Request) |
|
|
| Infrared System - Receivers available from the Student Learning Centre (E.G.19) |
| Height Adjustable Lectern (Motorised) |
|
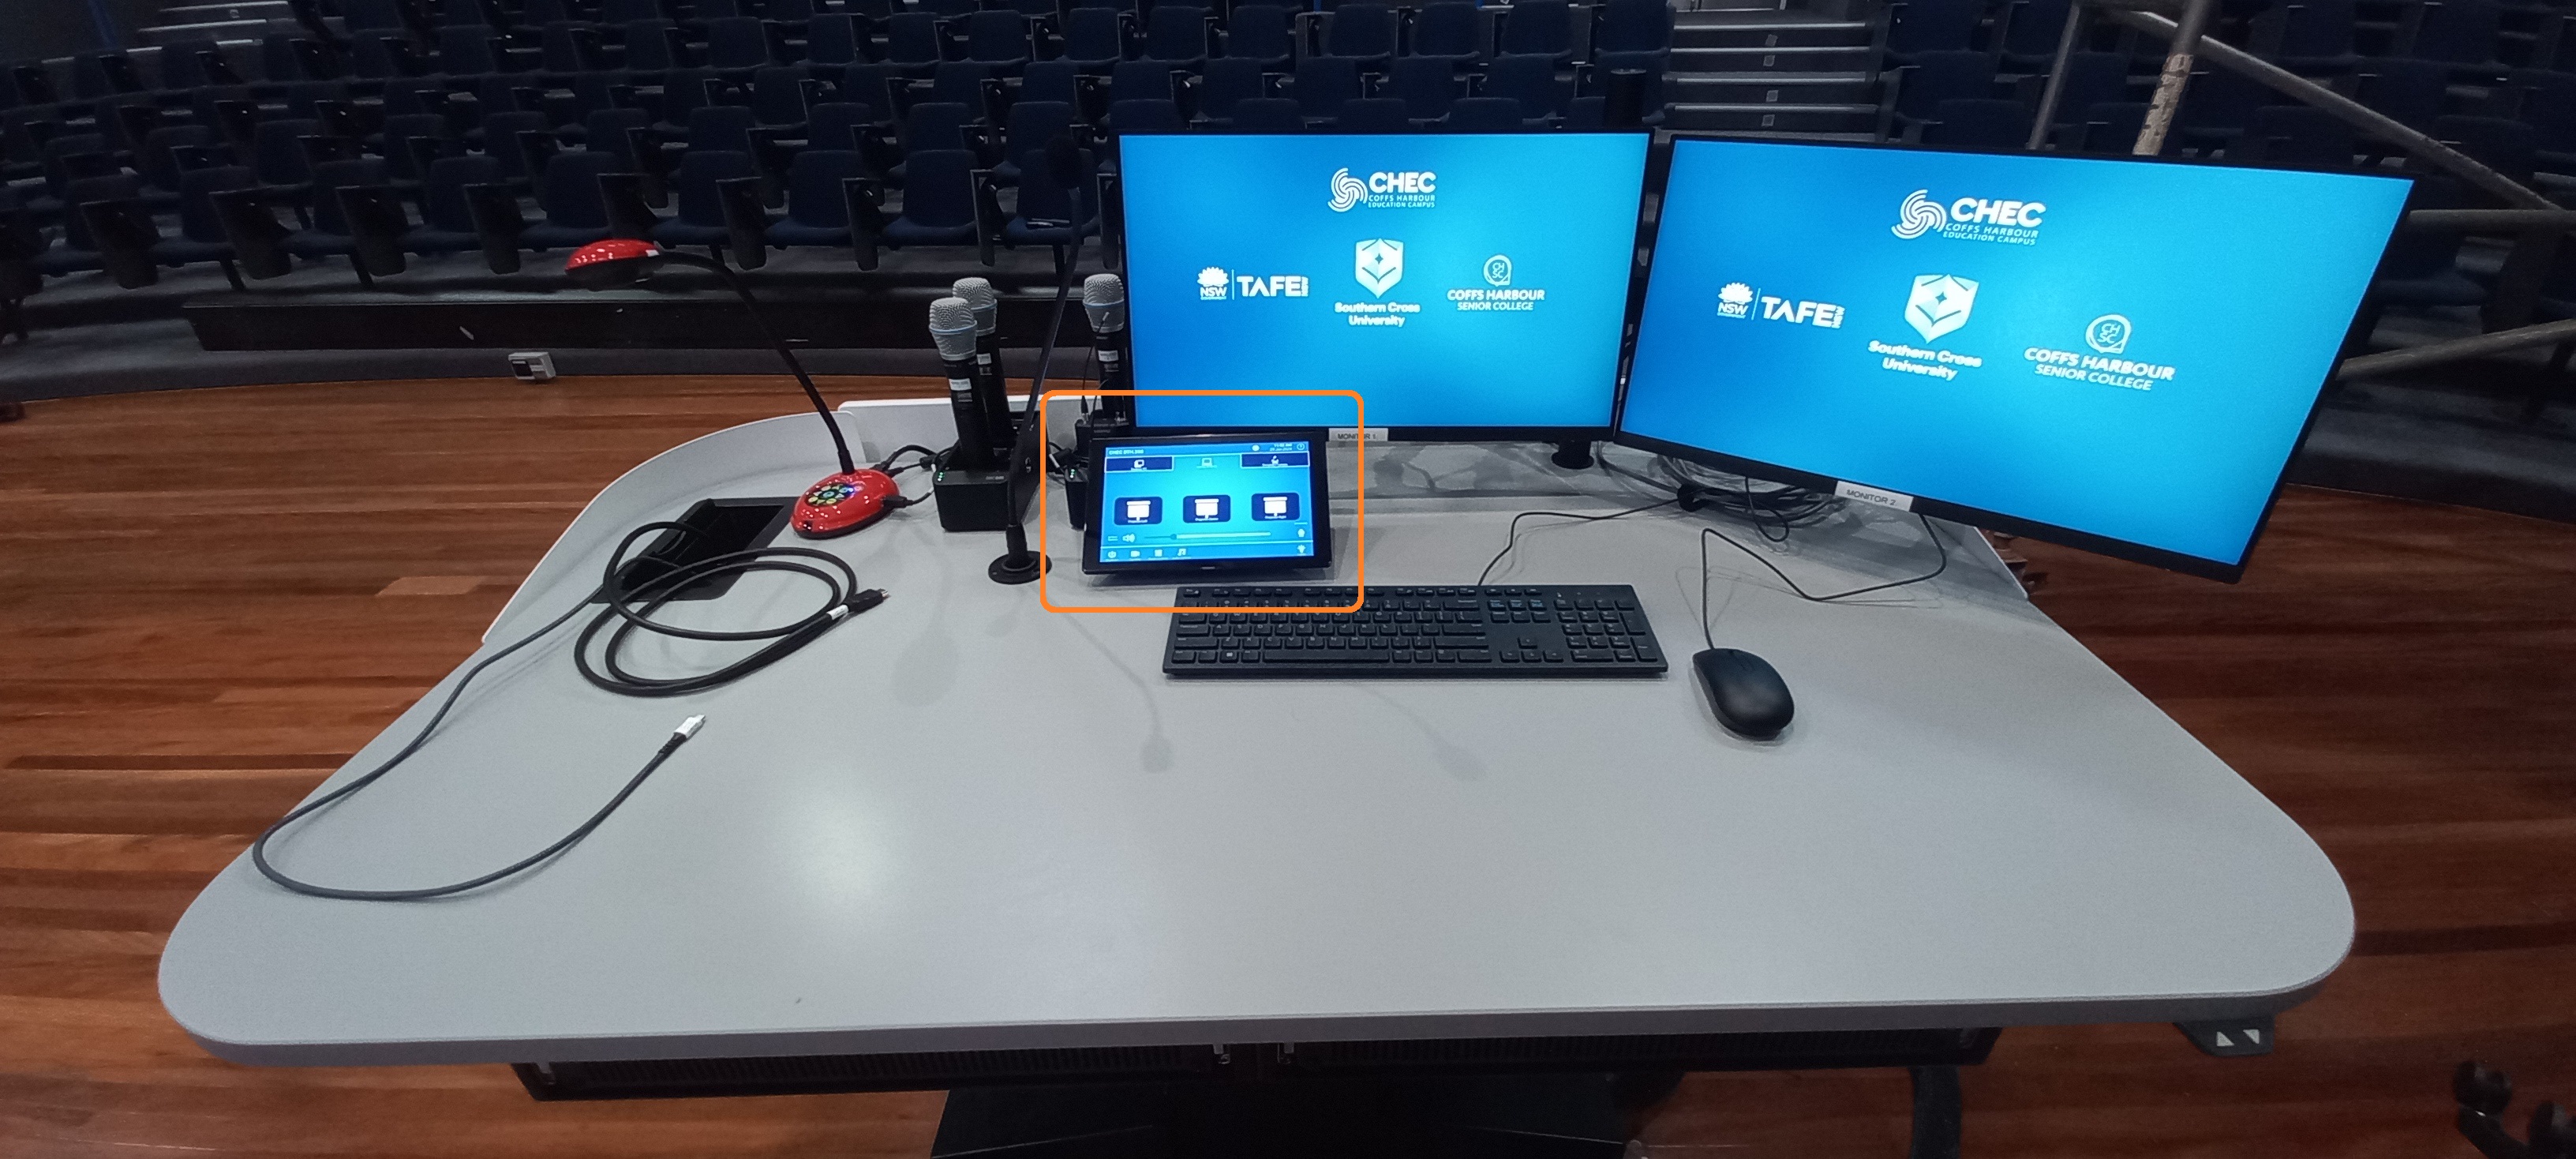
Use the AV Touch panel to Control room Technology (Located on Lectern).
1 -Quick Start Menu (Turn ON)
1 - Main Menu Navigation
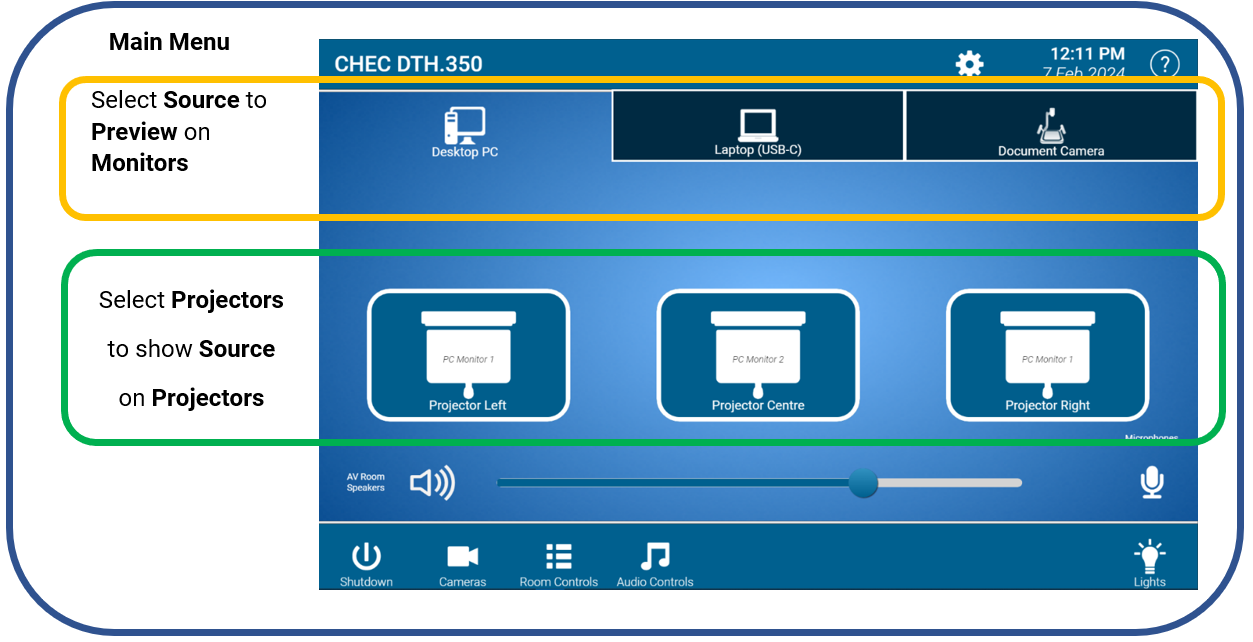
2 - Display Options
Custom display layouts can be achieved
E,g, PowerPoint Presenter mode: Show 1 monitor on Both Projectors to keep notes private
- Press and & Hold the Project Button.
- Select Monitor 1 or Monitor 2.
- This will Project the content currently displayed on the selected monitor.
1 - Laptop Connectivity
Connect Your Laptop using the supplied cable:
- USB-C Cable
Or
2.HDMI Cable
| Conection Type | Functionality Provided to connected laptop |
|---|---|
|
|
|
|
IMPORTANT! Only 1 Cable type should be connected to a laptop
If both cables have been connected:
a) Remove both cables and only attach the 1 cable.
b) Re-select the Laptop Project buttons on the AV touch Panel.
1 - Device Selection
The AV System provides camera and Microphones integration for use with Zoom & MS Teams on the following devices:
- Teaching PC.
- Laptop USB-C Connection.
Correct USB Speaker, Microphone and Camera Devices must be selected within the application utilised.
| Device | Selection |
|
|---|---|---|
| Speaker Device | Room AV | |
| Microphone Device | Room AV | |
| Camera Device | Room AV |
1 - Camera Selection and Control
- Select the camera icon from the Main Touch panel menu (bottom right):
- The Camera menu will appear.
- Selecting a camera will change the camera shown in a Zoom / MS Teams call.
- Use the Zoom in/out and Direction controls to move/position the camera show as required.
- Press and Hold the Preset Buttons to Store new position presets:
1 - Audio and Microphone Controls
- AV volume (PC/Laptop) control is located on the Main Menu Page of the AV Touch Panel.
- Microphone Mute/Unmute control is located on the Main Menu Page of the AV Touch Panel.
- All Microphones are controlled from the 1 Microphone Mute/Unmute button.

2 - Microphone Volume
- Access Microphone volume Control from the Audio Controls button (located bottom right of touch panel).
- Adjust Microphone volume using the slider - This will adjust the volume of all microphones.

- NOTE: the microphones volume does not affect microphone volume in a Zoom/ MS Teams Call.
Microphone volume is for Local room voice amplification only. It does not need to be turned up for use in Zoom/ MS Teams.
1 - Bluetooth Connectivity
- Bluetooth connectivity is provided to playback music from personal phones and devices.
- Access the Audio Controls page to Pair a bluetooth device:
- Press "Pair/Connect" Button
- Search for the "Room Name-Bluetooth" on your device to connect e.g "A109-Bluetooth"
- You have 60 seconds to complete the pair process, pressing the connect button will start the pairing process again.
Notes:
- When the AV system is shut down, bluetooth will disconnect.
- The Pair process will need to be completed each time bluetooth is required - It will not remember devices by design.
- Volume of bluetooth audio is controlled from the device, not the room volume controls.
1 - Stage Fill Speakers
- Additional speakers are located on the Stage Ceiling pointing back towards the presentation floor/ Lectern.
- These can be attenuated independently if required via the "Stage Fill Controls" found in the Audio Controls menu.


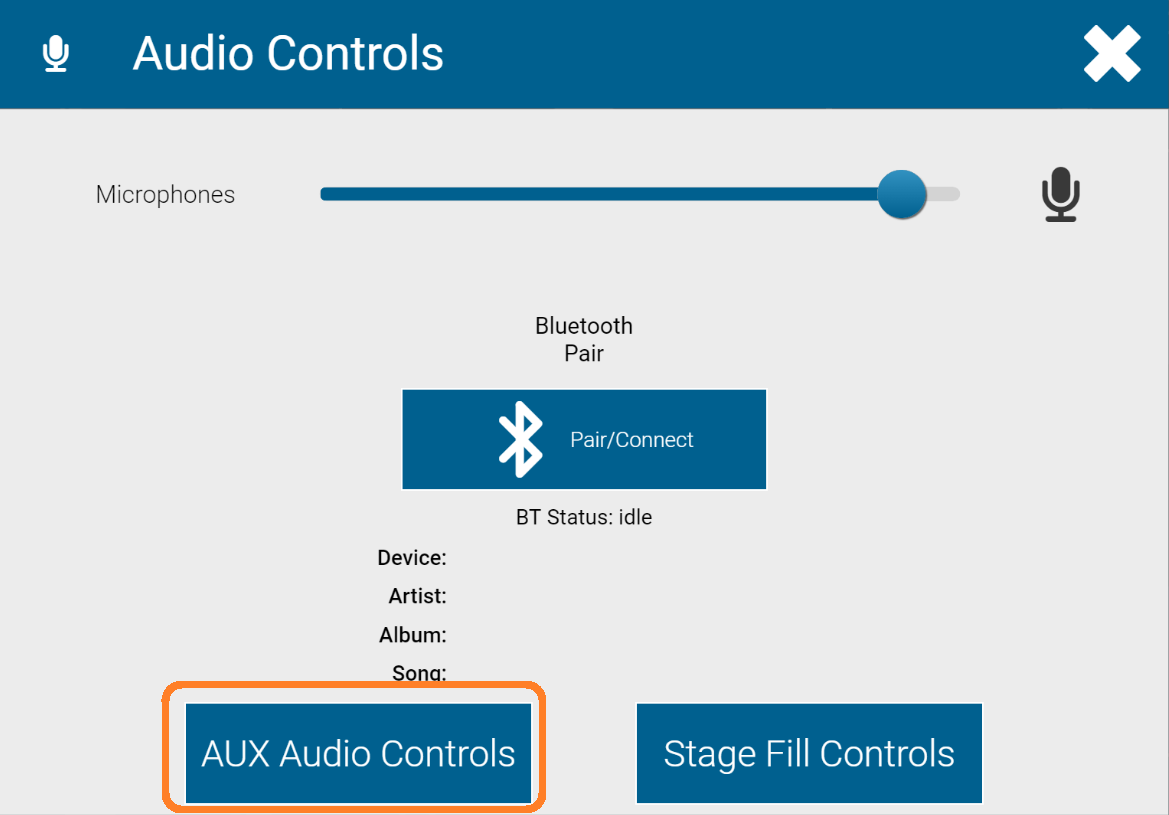
2 - Aux Audio Controls
- Additional Audio inputs and hardwired microphones can be patched in the Room AV system and accessed via the "Aux Audio Controls Page"
- These can be attenuated independently if required.

1 - Room Lighting
Room Lighting can be adjusted at the Lectern.
Press the button located in the bottom right of the AV touch panel.
Adjust room lighting to requirements.
1 - Stage Lighting Control
Stage lighting control is available from the Lights page.
- Press the button located in the bottom right of the AV touch panel.
- Press the button.
3. Select "ALL ON" to turn on 8 lights, illuminating the entire front of the stage area
OR
4. Turn on any of the 8 Lights individually - Descriptions are given above each control to identify a location that will be illuminated.
Lighting can be dimmed up and down using the arrow buttons

2 - Coloured Stage Light Control
A subset of Coloured stage Lights can be controlled from the lectern AV Touch panel.
- Select "Coloured Lights" from the Stage Lighting Menu (Bottom Right)
- Select Colours to illuminate either
a) The Rear stage curtain
b) The Stage Area

1 - Combine D350 / D150
When the D150/D350 operable wall is open (DTH.500 Mode)
the AV system is required to be in "Combined Mode"
This facilitates:
- Room Lighting Control synchronisation.
- Audio Content/ Microphones in DTH.350 are broadcast to the Speakers in DTH.150 theatre, to provide clear audio coverage to the entire theatre.
- Select the Room Controls Icon from the bottom of the AV Touch Panel
2. Press " Room Combine "

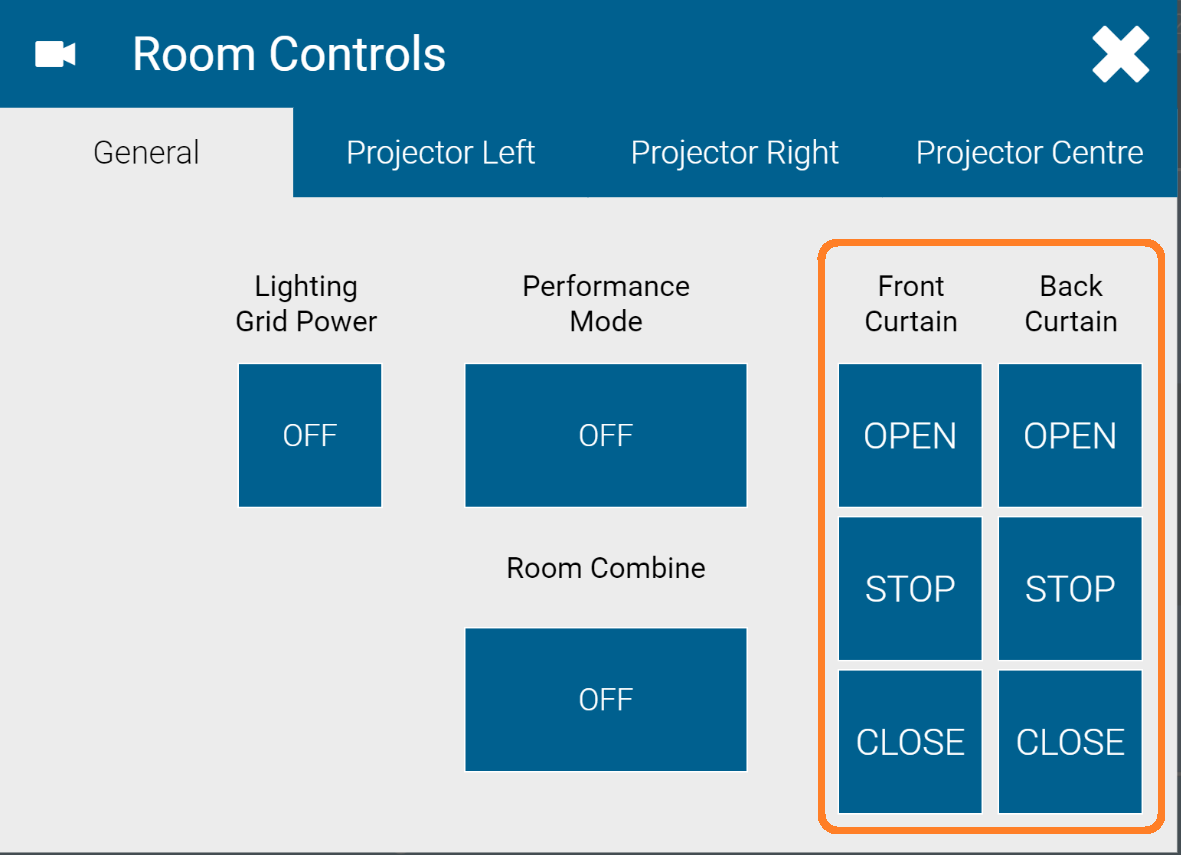
1 - Curtain Controls
Front and Rear Stage Curtain control can be controlled from:
- Wall Panel controls located in the Stage Right Wing.
- Via the AV Touch Panel under the Room Controls page.
- Select the Room Controls Icon from the bottom of the AV Touch Panel.
2. Operate Curtain controls.
1 - Manual Project/Screen Control
Projectors and screens can be manually operated via the "Room Control" Page.
- Select the Room Controls Icon from the bottom of the AV Touch Panel.
2. Select a projector to manually operate projector and screen.
Apple/Mac Dual Screen - USB-C
- Apple/Mac Laptops connected via the USB-C cable may need to install DisplayLink macOS Software to enable dual monitor output to the AV system.
- DisplayLink macOS Software can be downloaded from here https://www.synaptics.com/products/displaylink-graphics/downloads/macos.
1 - Duplicate / Extend Windows Desktop
Microsoft Windows Display Layouts Can be changed on the dual monitors
Windows Key + P, then select Duplicate
2 - Power Point Presenter Mode
1 Use PowerPoint Presenter mode and Hide notes on Projectors (Display Notes on Preview Monitors only)
Goto the Slide Show tab and tick Use Presenter View, Start Slide Show From Beginning.
2. ON the AV touch panel Press and Hold on the Project buttons to reveal which monitor to show on the projector.
- Select the monitor that is showing the presentation only.
- Repeat for both projectors as required:
Apple/Mac Dual Screen - USB-C
- Apple/Mac Laptops connected via the USB-C cable may need to install DisplayLink macOS Software to enable dual monitor output to the AV system
- DisplayLink macOS Software can be downloaded from here https://www.synaptics.com/products/displaylink-graphics/downloads/macos
1 - Laptop Connectivity Options
Connect Your Laptop using the supplied cable:
- USB-C Cable
Or
2.HDMI Cable
| Conection Type | Functionality Provided to connected laptop |
|---|---|
|
|
|
|
IMPORTANT! Only 1 Cable type should be connected to a laptop
If both cables have been connected:
a) Remove both cables and only attach the 1 cable.
b) Re-select the Laptop Project buttons on the AV touch Panel.
Campus : CHEC Room: MLG.13
| |
|---|---|
| Capacity: 30 | |
Hybrid / Collaboration Activated
|

| Facilities | Detail |
|---|---|
| 2 x Projectors |
| Dual Monitors |
|
|
| Music Playback from BYOD (Phone) |
| |
| For use with Zoom / MS Teams |
| 18 x Delegate/Desk Microphones @Student Tables for Hybrid Colaboration 1 x Lectern Mic 1 x Wireless Hand Held Mic 1 x Wireless Lapel Mic |
| Infrared System - Receivers available from the Student Learning Centre (E.G.19) |
| |
|
Use the AV Touch panel to Control room Technology (Located on Lectern)

1 -Quick Start Menu (Turn ON)
1 - Main Menu Navigation
2 - Display Options
Custom display layouts can be achieved
E,g, Powerpoint Presenter mode: Show 1 monitor on Both Projectors to keep notes private
- Press and & Hold the Project Button
- Select Monitor 1 or Monitor 2
- This will Project the content currently displayed on the selected monitor
1 - Laptop Connectivity
Connect Your Laptop using the supplied cable:
- USB-C Cable
Or
2.HDMI Cable
| Conection Type | Functionality Provided to connected laptop |
|---|---|
|
|
|
|
IMPORTANT! Only 1 Cable type should be connected to a laptop
If both cables have been connected:
a) Remove both cables and only attach the 1 cable.
b) Re-select the Laptop Project buttons on the AV touch Panel.
1 - Device Selection
The AV System provides camera and Microphones integration for use with Zoom & MS Teams on the following devices:
- Teaching PC.
- Laptop USB-C Connection.
Correct USB Speaker, Microphone and Camera Devices must be selected within the application utilised.
| Device | Selection |
|
|---|---|---|
| Speaker Device | Room AV | |
| Microphone Device | Room AV | |
| Camera Device | Room AV |
1 - Camera Selection and Control
- Select the camera icon from the Main Touch panel menu (bottom right):
- The Camera menu will appear.
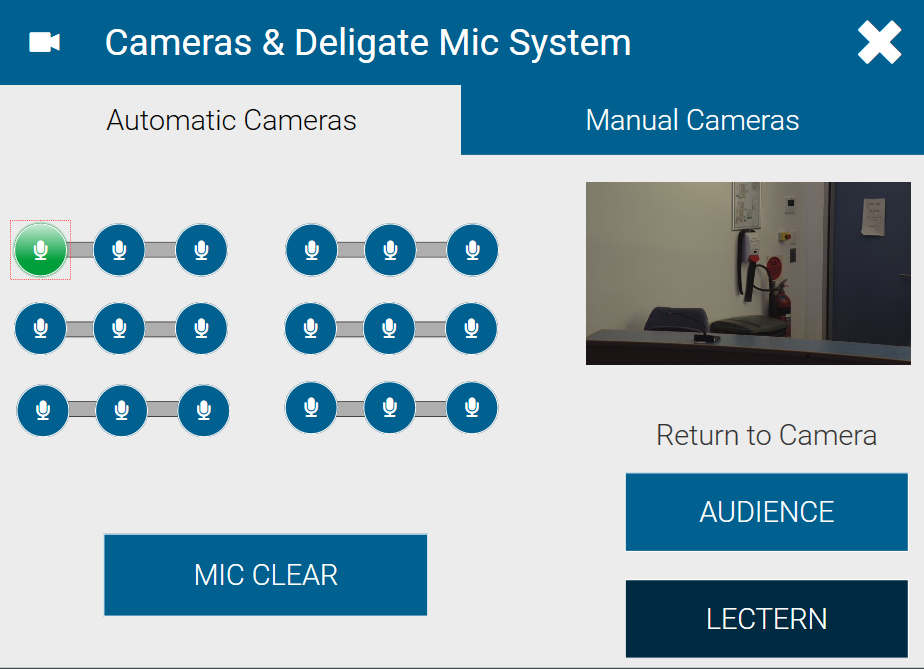
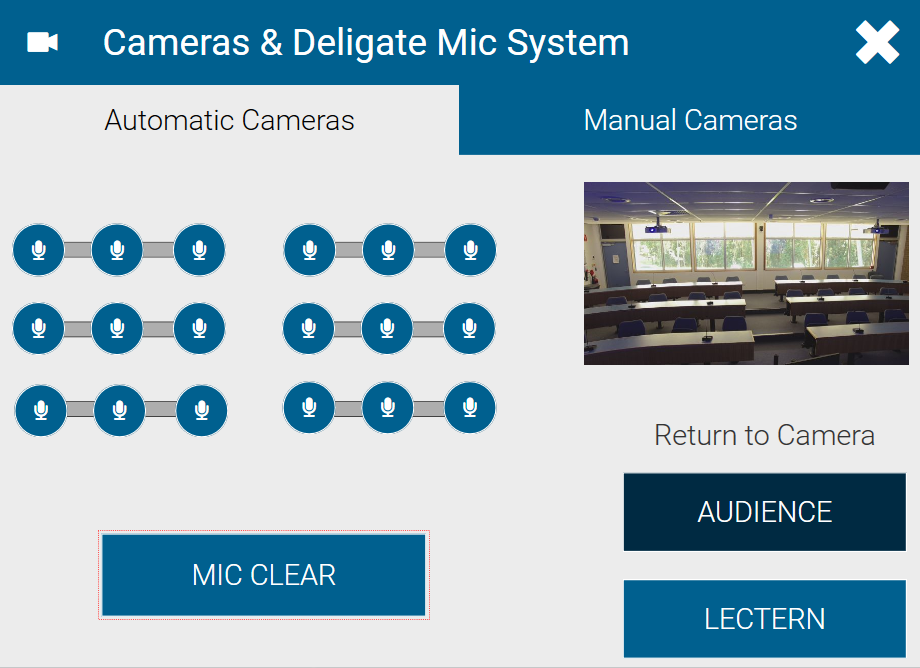
Automatic Cameras (Camera Automation) Mode
- Icons will Show the Active Desk Microphone OR You can select to activate a delegate desk Microphone.
- Activating a delegate desk Microphone will result the Camera(s) switching automatically to the postion of the active microphone/talker.
- Pressing the "Mic Clear" Button will deactivate desk microphones and Return the camera/angle back to either
a) The Lectern or
b) the Audience , depending if the "Audience" or "lectern buttons" are engaged
Manual Cameras Mode
- Select a camera
- Use the Zoom in/out and Direction controls to move/position the Camera show as required.
- Press and Hold the Preset Buttons to Store new position presets:

1 - Audio and Microphone Controls
- AV volume (PC/Laptop) control is located on the Main Menu Page of the AV Touch Panel.
- Microphone Mute/Unmute control is located on the Main Menu Page of the AV Touch Panel.
- All Microphones are controlled from the 1 Microphone Mute/Unmute button.
2 - Microphone Volume
- Access Microphone volume Control from the Audio Controls button (located bottom right of touch panel.
- Adjust Microphone volume using the slider - This will adjust the volume of all microphones.
- NOTE: the microphones volume does not affect microphone volume in a Zoom/ MS Teams Call
it is for Local room voice amplification only. It does not need to be turned up for use in Zoom/ MS Teams.
1 - Bluetooth Connectivity
- Bluetooth connectivity is provided to playback music from Phones or other Devices.
- Access the Audio Controls page to Pair a device:
- Press "Pair/Connect" Button
- Search for the "Room Name-Bluetooth" on your device to connect e.g "A109-Bluetooth"
- You have 60 seconds to complete the pair process, pressing the connect button will start the pairing process again.
Notes:
- When the AV system is shut down, bluetooth will disconnect
- The Pair process will need to be completed each time bluetooth is required - It will not remember devices by design
Apple/Mac Dual Screen - USB-C
- Apple/Mac Laptops connected via the USB-C cable may need to install DisplayLink macOS Software to enable dual monitor output to the AV system
- DisplayLink macOS Software can be downloaded from here https://www.synaptics.com/products/displaylink-graphics/downloads/macos
1 - Duplicate / Extend Windows Desktop
Microsoft Windows Display Layouts Can be changed on the dual monitors
Windows Key + P, then select Duplicate
2 - Power Point Presenter Mode
1 Use PowerPoint Presenter mode and Hide notes on Projectors (Display Notes on Preview Monitors only)
Goto the Slide Show tab and tick Use Presenter View, start Slide Show From Beginning.
2. ON the AV touch panel Press and Hold on the Project buttons to reveal which monitor to show on the projector
- Select the monitor that is showing the presentation only
- Repeat for both projectors as required:
Apple/Mac Dual Screen - USB-C
- Apple/Mac Laptops connected via the USB-C cable may need to install DisplayLink macOS Software to enable dual monitor output to the AV system
- DisplayLink macOS Software can be downloaded from here https://www.synaptics.com/products/displaylink-graphics/downloads/macos
1 - Laptop Connectivity Options
Connect Your Laptop using the supplied cable:
- USB-C Cable
Or
2.HDMI Cable
| Conection Type | Functionality Provided to connected laptop |
|---|---|
|
|
|
|
IMPORTANT! Only 1 Cable type should be connected to a laptop
If both cables have been connected:
a) Remove both cables and only attach the 1 cable
b) Re-select the Laptop Project buttons on the AV touch Panel
In OTH96, the controls for this space are via this console (Touch Panel);

Recommendation - use the HousePC, add your media (DVD/CD/USB) to this computer
How To Display Content on Projectors
Step 1: Select Input (HousePC, VGA, HDMI, Visualiser)
Step 2: Select Projector (s) desired to show Selected source
Step 3: Project Buttons will illuminate green to indicate they are displaying the selected source on the preview area
Step 4: Login To HousePC
Step 5: Unmute Program Volume using the volume controls on the console (Touch Panel)
Camera Controls
Step 1: Select desired camera
Step 2: Move the camera using the provided button controls
Step 3: Zoom the camera in/out using the provided button controls
Microphone Mute/Unmute - Room
Microphone mute/unmute and volume controls located on the console touch panel
Control what you hear in the room only - It does not affect what far end Video Conferencing participants hear
Missing Controls
The centre wallpaper/background is very similar to the HousePC, touch the centre of the screen
Room A1.20 is a bookable meeting space facilitating software based Video Conferencing applications (Zoom, Ms Teams etc).
Contact CHEC campus room bookings to make a booking CHEC Facilities System, chec.roombook@tafensw.edu.au or 02 6659 3093
Meeting Space A1.20 requires you to bring-your-own-device (BYOD)

AV Facilities:
- USB PTZ (Pan Tilt Zoom) Camera
- USB Table Microphones
- 2 x 65" Displays
- Phone
- USB-C Connection - Single Cable connection for BYOD devices. Provides connection to 2 x Displays, USB Camera, Microphones and Audio.
Getting Started – Using your Own Laptop or Device.
- Plug in the provided USB-C cable into your Laptop.

This single cable provides connection to the displays, camera, microphone and speaker.
2. Turn on your device and sign in.
The displays will automatically turn on (usually after you have signed in).
The displays will automatically turn off 5 minutes after you remove the cable or shut down your device.
3. Adjust your screen layouts as required:
Hold down the the “Windows” key and the “P” key on your keyboard to select ‘Duplicate’ or ‘Extend’ to adjust display layouts.

USB Audio & Camera Devices to select on your device
Ensure the following audio and camera devices are selected in your preferred collaboration / video conference software application (MS Teams / Zoom etc):
- Camera: ‘Logi Group Cam’
- Microphone: ‘Echo Cancelling Speakerphone (Logi Group Speakerphone)’
- Speaker: ‘Echo Cancelling Speakerphone (Logi Group Speakerphone)’
Camera & Microphone Operation
- The camera can be repositioned (Pan/Tilt) and zoomed in/out using the remote control or the controls on the speakerphone unit located on the meeting room table.
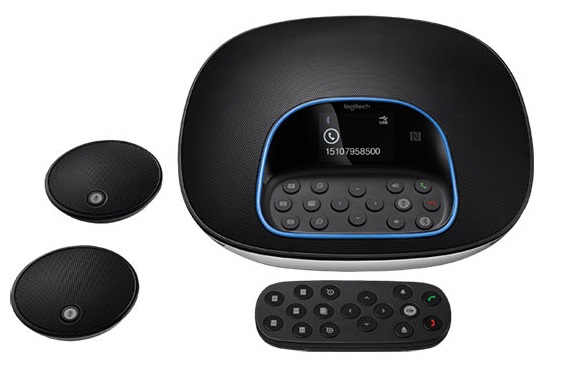

- Move the Camera (Pan/Tilt) using the < > ^ ˅ buttons
- Zoom in/out using the + and – buttons
- Recall Camera pre-set positions using the numerical 1-6 buttons.
- Mute/Unmute the microphones during a call using the microphone buttons.
- Volume can be adjusted using the speaker buttons.
Trouble Shooting
Issue: Displays do not turn on / no image on displays
FIX: Some laptops/devices including Apple Devices may need to install the following ‘Displaylink’ drivers to utilise the room technology: https://www.synaptics.com/products/displaylink-graphics/downloads.
Issue: Camera not displaying within application, far end cannot hear or be heard.
FIX: Within the application select the correct USB audio and camera devices as stated here
Issue: Both displays display the same content.
FIX: Hold down the “Windows” key and the “P” key on your keyboard to select ‘Duplicate’ or ‘Extend’ to adjust display layouts.
Require AV Support?
Some rooms have a phone to contact the service desk for assistance, if not please contact the CHEC Service Desk.
If you are planning an event that requires AV support please contact the CHEC Service Desk.