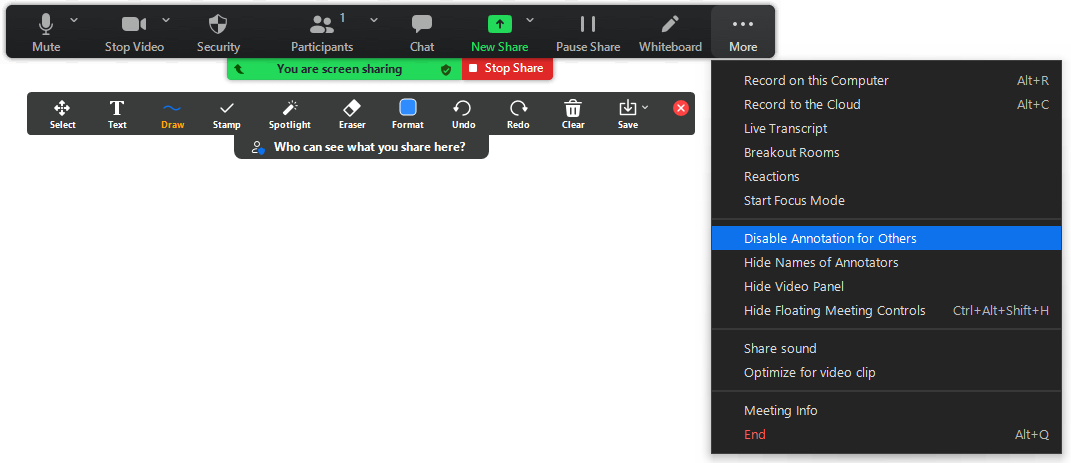
Zoom Annotation tools
The following articles discusses the use of the Zoom Annotate tool for live online classes.
What is the Annotation tool?
During Zoom meetings and while the screen share mode is enabled, it is possible for hosts and participants to Annotate on the shared screen. This allows participants to draw, write and illustrate on the screen. The results can be cleared by the host or saved for later use.
For example, it is possible to share a PPT, PDF, image, or any other visual and then engage students in annotating the shared screen.
Students are able to;
- use the stamp tool to mark key areas on the screen
- use the text tool to write keywords for brainstorming using a blank screen or prompt image.
- use the draw tool to circle key information displayed on a slide, or draw relationships between the elements on screen.
Using the Annotation tool
- Ensure that you are screen sharing, and can see the green and red "You are screen sharing and Stop Share" .
The Annotate toolbar should be available from the taskbar.
Show Annotate
You might need to check the View Options at when you hover at the top of the Zoom window to display the Annotate toolbar if it is closed.
- Click "Annotate", which is to the top-right, to open the toolbar, and the Annotate toolbar will open. Use the tools to draw (annotate) on the shared screen.
Once the activity is complete, you can save a copy of the annotated screen. The Save button is located on the far right of the Annotate toolbar.
Finding a saved annotation
After clicking "Save", immediately open the folder by clicking the "Show in Folder" prompt, so you know the exact location of the file.
The following video demonstrates the use of the Zoom Annotate tool.
Annotate Tools
The Annotate toolbar contains a range of tools that support drawing on screen. These are detailed in the following table.
| Tool | Function |
| Select | drag and drop elements you have annotated to different locations on the screen |
| Text | type in a textbox on screen ("Format" buttons control the colour, bold, italics, and font size) |
| Draw | add lines, highlighting, arrows, diamonds, squares and circles. Squares and circles can be used as either outlines, shade filled, or fully filled with colour (use the "Format" button for desired effects) |
| Stamp | use six stamp types: right-pointing arrow →, tick The colours cannot be changed but they can be useful tools when asking participants to mark/select/choose items on your shared screen. |
| Spotlight | has three useful tools: the Spotlight, the Arrow, the Vanishing Pen.
|
| Eraser | erases annotations on screen as you select them |
| Format | allows you to change line colour, fill colour, line width, bold/italic font, and font size |
| Undo/Redo | undo and redo annotations, should you happen to erase them, etc. |
| Clear | erases annotations with three options: to clear only your drawings, to clear others' drawings, or to clear all drawings |
| Save | save the annotated screen share, either as a PDF or a PNG file (image filetype). Clicking the "Save" button will automatically save the screen and prompt you with a folder location for where you can find the saved file. |
| closes the annotation bar |
Manage Annotations
Use the "More" menu on the top far-right, you can "Enable/Disable Annotation for Others". You may find it useful to start with annotation disabled and then enable it as required during an online class.


