Zoom Breakout Rooms for Group work
Breakout rooms allow a live Zoom meeting to be divided into multiple separate rooms. Zoom's breakout rooms are a highly effective tool that facilitates student group collaboration, greater engagement and interactivity among students, and supports Active Learning approaches in class.
Breakout Room requirements
- You must be the Zoom account holder, or an Admin to start and manage a breakout room
- Enable Zoom breakout rooms under Settings > Meeting (Advanced), and click the breakout room toggle to enable it.
- To access the most current breakout room features you will need the Zoom desktop client version 5.10.3 or later. Make sure you regularly check for Zoom updates.
- For more guidance see the following Zoom Support Article: Enabling breakout rooms
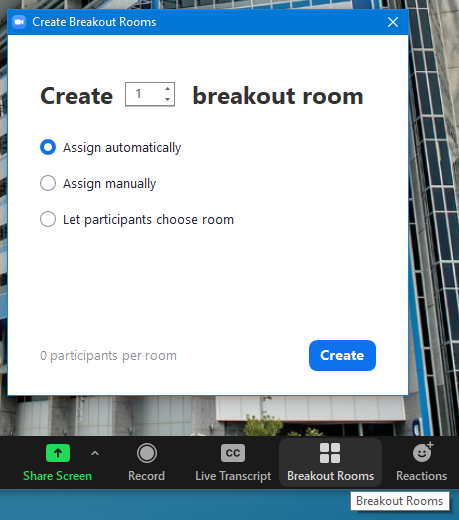
Creating a breakout room
Start the Zoom meeting and wait until all participants have arrived and been admitted from the Zoom waiting room (if enabled).
Click the Breakout Rooms button located at the bottom of the Zoom toolbar. Select the number of rooms you wish to create.
How many rooms do I need?
Zoom will calculate how many people will be in each group based on the number of rooms you create. This is listed at the bottom of the breakout Room window as "X" participants per room.
You will need to decide whether to assign students automatically, manually, or let participants choose rooms themselves. These options are explored below.
Participant assignment option How it works Use case Assign Automatically
Randomly assigns participants to the number of groups you specify Where you need to quickly and randomly assign students for a one-off activity Assign Manually
You manually choose which room each participant may join Where students must be allocated to a particular group (and the number of students is manageable) Let participants choose room
Participants select a room they wish to join themselves Where groups are based around student choice, or to reduce the management required for large numbers of student groups. Pre-assign Breakout Rooms
It is also possible to pre-assign students before a meeting started using an excel CSV file. This is useful when there are large numbers of students and you have time to spend arranging the class into breakout rooms before class. More information on this process can be found here: Pre-assigning participants to breakout rooms
Click on the Create button to start the breakout Rooms.
- To manage the breakout rooms in progress, hover your pointer over the name of the breakout room and click the ellipsis button
 to access more options for that particular breakout room.
 - Add Participants: Add additional participants to an existing breakout Room. Select the participants you want to add to this room and click Assign.
- Rename: Rename the breakout Room. Enter the new name of the room and click Rename.
- Delete Room: Delete the already in-progress breakout Room. The option to delete a breakout room is only available if the breakout room has not been opened, or the room has no participants in the room.
- To stop the breakout rooms click on Close All Rooms. After a 60-second countdown is shown to the host, co-hosts, and participants, all participants will return back to the main meeting.
Changing Rooms in progress
The following video shows breakout rooms in action.
Suggested activities for Zoom breakout rooms
Below are some suggestions for how you might use Zoom breakout rooms.
| Function / Purpose | Breakout room activitites |
|---|---|
| Introductions | Warm-up task at the beginning of a 6-week term, where students would introduce themselves. After prior instruction, students could be tasked with personal introductions, and then discuss their course expectations. |
| Summarising | After delivering content on a key element in a Workshop, use breakout rooms to discuss the key ideas surrounding that point. |
| Topic Specific grouping and reporting | Name rooms according to various topics (e.g. related to specific readings). Students in each room discuss their respective topics before summarising the ideas and bringing them back to the main room. |
| The Art Gallery Tour | Pre-named rooms for small group discussions could be created with time given to prepare collaboratively on a topic. Once the time is up, students freely move between rooms with one member left behind to present as the topic host. This rotational tour could be set to a timer, enabling each group member to visit all other rooms and experience the role of the presenter. |
| Feedback Room | Create two rooms. While allocating the majority of students to Room1 to complete an activity, individual feedback could be delivered to a student/group in Room 2. Rotate as required given your time constraints. |
| Troubleshooting Room | Present students with a task, and open a single room for troubleshooting when students have a problem. Giving them permission to jump from room to room allows students to access help when they're having difficulties with the task. |